Sometimes life involves some waiting around. You find yourself waiting for news from hospitals and other such places, not really able to concentrate on anything important yet trying to find something to do to pass the time.
Fairly recently I found myself in such a situation and looking for something to do to pass the time. Flicking around Lightroom I came across the smart Collection called "Without Keywords". I thought that most of my image collection was keyworded, boy was I wrong. There were 15,000 pictures in that collection!
If you ever need something mind numming and repetitive to do, I can recommend keywording 15,000 pictures.
So how had this happened? I have quite a thought out and orderly workflow, but I must be missing stuff.
Though a lot of the problem stuff was from an older time before I got more disciplined.
It seems that I need a way to check that I am sticking to my processes and the "without Keywords" smar collection got me thinking. Why not define my entire archive process a series of smart collections.
So, how do I create a smart collection that lets me know if I have forgotten to put a location against any of my photos. Well I have my location keywords in a big hierarchical structure based in a root keyword of "Places":
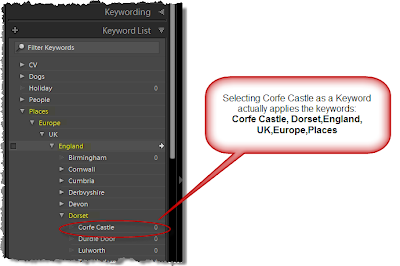
So if I create a smart collection like this:
Any pictures that appear in it have not had a place added on the keywords.
I have created a series of smart collections that allow me to see easily how far I am through my archival process:
Some of the smart collections are simply place holders to remind me to do stuff:
Friday 13 August 2010
Using Smart Collections to improve your Lightroom Workflow
Wednesday 4 August 2010
How to Use a 10 stop ND filter
One of the most common questions you get as a landscape photographer is "What filters do you use?", second only to the "did you do a lot of Photoshopping on this picture?".
Well normally I only use ND graduated filters to hold back the brightness of the sky. Without them you either get white sky or black land under the more extreme lighting conditions of sunset & sunrise (alternativly you can use HDR).
Lately I have been messing around with a 10 stop B&W filter. The main reason for using it is to get a much longer exposure, which can lead to movement in the sky or to smooth out waves in water. In addition any people (or in this case ducks) that are moving disappear out of the photo. Here is an example of the effect, taken on the banks of Derwent Water:
The 10 stop filter is a very dark piece of glass - like shooting through a welding mask. So it requires a slightly different technique.
Just so you can appreciate the effect of the filter. Here is the test shot:
You can achieve similar effects without the filter. But to do that you need quite low light, this was taken 45 mins before sunrise and it was so dark that to the naked eye you could hardly see the pier:
Well normally I only use ND graduated filters to hold back the brightness of the sky. Without them you either get white sky or black land under the more extreme lighting conditions of sunset & sunrise (alternativly you can use HDR).
Lately I have been messing around with a 10 stop B&W filter. The main reason for using it is to get a much longer exposure, which can lead to movement in the sky or to smooth out waves in water. In addition any people (or in this case ducks) that are moving disappear out of the photo. Here is an example of the effect, taken on the banks of Derwent Water:
Kettlewell
181 Seconds at f/22 Using a 10stop ND filter.
The 10 stop filter is a very dark piece of glass - like shooting through a welding mask. So it requires a slightly different technique.
- First I set up the camera on a sturdy tripod. I set the camera to in manual mode and took a straight shot at f/22.
- A look at the histogram confirmed a 0.3nd grad would be needed to calm down the sky and consequently lighten the land.
- Another shot confirmed that the 0.3 filter was correct.
- Next I switched the lens to manual focusing as auto focusing through the 10 stopper dosn't always work and our test shots have confirmed the focus & composition are what we want so we don't want them to change.
- Screw the 10 stop ND back on and then the 0.3ND.
- Using the ND Calc iphone app allows me to easily calculate how much the exposure is lengthened by adding the 10 stopper.
- I Switch to bulb mode and then use the timer built into ND calc to time the exposure.
- Then just open the shutter till the timer goes off and try not to get bitten by too many mossies.
Just so you can appreciate the effect of the filter. Here is the test shot:
1/6Sec @ f/22
You can achieve similar effects without the filter. But to do that you need quite low light, this was taken 45 mins before sunrise and it was so dark that to the naked eye you could hardly see the pier:
Southwold Blues
15 Seconds @ f/5
Labels:
Filters,
Taking Pictures,
Technique
Sunday 1 August 2010
Kris Dutson is photographer of the month for August
Dorset based Landscape photography Kris Dutson has many beautiful and award winning photographyHis website is worth a visit.
Pulpit Fire
by Kris Dutson
Previous Photographers of the Month
Pulpit Fire
by Kris Dutson
Previous Photographers of the Month
Labels:
Photographer of the Month,
Photographers
Subscribe to:
Posts (Atom)