Tuesday, 17 July 2012

A Sixth of the way already

So I'm now 2 months in to my 365 project and things are going well.  London is gearing up for The Olympics and it's associated cultural Olympiad which means that it's a very target rich environment.
Which makes up a bit (but not much) for it being the wettest summer ever.

Passing Strangers

Beacon View

Before The Funeral

Cloud over Temple Field

Greenstead Church

Pentery Church

Pidgeon and Piano

Scruffy the huffy chuffy tug boat

Dancing Shadow

The Shard

Towards Bumbles Green

Sunday, 17 June 2012

One down, eleven to go

A month ago, to celebrate my birthday and my present of a brand new Olympue Pen EP-M1 I decide to embark on a 365 project. For those who don't know, the idea is that you have to take a shot every day for an entire year. So far I have managed to find something to shoot every day, so here are the highlights from my first month at this:

British Summer Time
British Summer Time
Man on a Mission
Man on a Mission
Lambourne Church
Lambourne Church
The Tower of London Tat Tower
 
Sign of the times
Sign of the times

Key Light
Key Light

Audley End
Audley End

Morris Men
Morris Men

One Poultry
One Poultry

Watching you watching me

The Gherkin
The Gherkin

Crates
Crates
 

Tuesday, 17 April 2012

Google Map Lightroom Web Gallery

Now that Lightroom 4 is here geocoding is suddenly centre stage and images don't feel properly filed unless they have a set of co-ordinates attached to them.  Whilst LR4 offers many features that are needed to handle geocoding and maps, it is noticeable that the web module does not offer the facility to export these pictures in a map format.

As part of the redesign of my site I decide that it might be nice to create a photo gallery driven entirely from a Google map and produced from Lightroom.
For those who just want the goodies
`To install the web gallery
  1. Extract the downloaded zip file.
  2. Copy the archive contents to one of the following destinations, depending upon your system. If you have not already done so, you will must create the Web Galleries folder manually.

    Mac
    Users/username/Library/Application Support/Adobe/Lightroom/Web Galleries/
    Windows XP
    C:\Documents and Settings\username\Application Data\Adobe\Lightroom\Web Galleries\
    Windows Vista/7
    C:\Users\username\AppData\Roaming\Adobe\Lightroom\Web Galleries\
    In Windows XP, the “Application Data” directory is usually hidden. The same may apply to the AppData folder in Vista.
  3. Open Adobe Lightroom and access the Web module. In the upper right, under “Engine”, you should seea new gallery called Shepherdpics Map.
For those who want to know how it works

To borrow some text from Joe Colson:
This information is intended for plug-in developers and those intrepid souls who want to understand what lies beneath the surface of a Lightroom gallery engine. It isn’t my intention to make this series of posts a definitive guide to Lightroom gallery engine design or anatomy. Instead, I’d recommend starting with the Lightroom SDK 2.0 Programmers Guide and Lightroom 2 SDK available from Adobe. The Adobe guide is a good starting point, but you can learn even more by dissecting an actual gallery engine, including those that are included in the SDK.

As per usual I am standing on the shoulders of giants here and in this case the whole thing is based on this article from Sitepoint and some code from Joe Colson's article on a geocoding plug-in.
The first problem to solve was how to generate an xml file of co-ordinates.  To do this I added the following code to the manifest.lrweb file.

AddGridPages {
filetype="xml",
template="markers.xml",
rows=1000,
columns=1
}
this uses the index page markers.xml to generate the xml doc
<markers>
<lr:ThumbnailGrid>
<lr:GridPhotoCell>
<marker>
<name><% =image.metadata.title%></name>
<thumb>content/bin/images/thumb/<%= image.exportFilename %>.jpg</thumb>
<desc><% =image.metadata.description%></desc>
<largePage>source/<%= image.exportFilename %>_large.html</largePage>
<lat><% =lat%></lat>
<lng><% =lon%></lng>
</marker>
<% end %>
</lr:GridPhotoCell>
</lr:ThumbnailGrid>
</markers>

Which just builds up the xml file from the details of each image. The only tricky bit is converiting the coordinates to decimal degrees which is achieved by this bit of code
<%
local gpsData = image.metadata.GPS
local lat
local lon

if gpsData ~= "" then
local iter = string.gmatch(image.metadata.GPS, "%d+")
lat = iter() + (iter() * 60 + iter()) / 3600
lon = iter() + (iter() * 60 + iter()) / 3600
if string.find(gpsData, "S") then
lat = -lat
end
if string.find(gpsData, "W") then
lon = -lon
end
%>

Then it was just a question of modifying the javascript to pickup the values from the generate xml file. Using JQuery this is easily achieved like this:
var name = $(this).find('name').text();
var desc = $(this).find('desc').text();
var largePage = $(this).find('largePage').text();

The rest of the code is pretty standard stuff from the SDK.
I hope you found this of use and please leave a comment if you use the code anywhere, I love to know who reads this stuff

Sunday, 1 April 2012

Mike Otley is photographer of the month for April

Our photographer this month is Bracknell based Mike Otley.  Mikes real love is car photography and he produces some fantasticimages of them,  his website is worth a visit.


Porsche Cayenne Biturbo
by Mike Otley


Previous  Photographers of the Month

Thursday, 1 March 2012

Think Tank Streetwalker Hard Drive Backpack

At the beginning of the year I was fortunate enough to spend nearly a month in New Zealand.  It truly is a wonderful place for photography and I will at some point be posting some of the pictures on this blog.

Whilst planning the trip, it became obvious that I did not have a camera bag that would be suitable for taking as carry-on luggage.  Being a fan of Think Tank bags I took a look at their range for something suitable.  I looked at their Airport roller bags first (thanks go to Bob Johnson for letting me look through his vast Think Tank range).  Whilst the rollers were beautifully made, like everything Think Tank do, they were not really ideal as fully loaded I would easily go over my carry on weight allowance and more importantly once I was in NZ I would need a rucksack or camera bag as well for use on the actual shoots.

After much looking round the web at various reviews I decided on the Think Tank Streetwalker Hard Drive Backpack :

Photo by ThinkTank Photo
A few points attracted me to the Streetwalker Hard Drive:
  • It's from Think Tank - their products just ooze quality.
  • Carry on luggage size
  • Laptop slot - to save hassle at Airport Security.
In use it proved an excellent bag, it's clean lines meant it fit exactly under the seat in-front on Singapore Airlines.  Allowing me to access to all my kit through out the flight: for photos from the airplane windows, reading material or even the carefree 5 hours I spent keywording the 9500 images I took.  The only photographic items I put in my suitcase were my tripod and my pro-speed belt, as removing that keeps the bag nice and square for storing in airplanes, etc

Rather than lug a laptop everywhere I just used a tiny netbook, which meant the laptop slot had room for magazines and other A4 documents that I wanted to keep flat.  This slot makes the bag worth buying on it's own with dead easy access to your laptop or documents in seconds.  Security scans in airports ask for laptops to be scanned seperatly and the access in this bag made it a doddle.
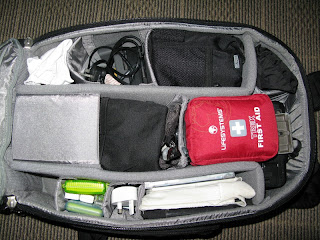
Packed for travelling between hotels in New Zealand
The first aid kit came out for flying as it upsets the security guards
The gap bottom left contained the Canon G9 that took the photo.

Travelling between hotels I could fill it with all my camera and computer gear, without worrying about damaging them and being able to grab my camera easily as we reached another "WOW" bit of scenery.  The distances in NZ are really short but it took ages to get anywhere as I kept having to stop and snap the scenery.
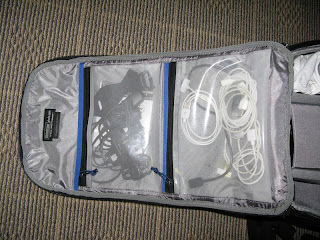

Big clear pockets in the lid make finding things really easy.


For Morning or evening Landscape sessions I could strip out the bag and just leave in my camera, lenses and filters.  Then once the tripos straps are attached I could fix the tripod to the back of the bag and I had a great landscape photographers rucksack.  For daytime expeditions I would leave the tripod behind, bung a rain jacket in one of the empty slots and a couple of bottles of water in the expanding side pockets and it was comfortable for very long walks.

For more dynamic trips I used my pro-speed belt and the Think tank modular system to allow me to have access to lenses as quick as possible.
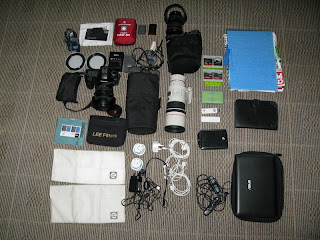
A fair bit of gear for one bag

 So what did I put in it:
  • Laptop Slot
    • Asus Netbook
    • Amazon Kindle
    • 2 Magazines
    • Travel Documentation
  • Main Compartment
    • Canon 5DmkII
    • Canon G9
    • Canon EF 24-105 f/4 L Lens
    • Canon EF 17-40 f/4 L Lens in Think Tank Modular Pouch
    • Canon EF 300mm f/4 L Prime Lens in Think Tank Modular Pouch
    • Canon 1.4x extender
    • LEE Filter Holder
    • 2 x LEE filter rings
    • 3 x LEE Soft Grads
    • 3 x LEE Hard Grads
    • LEE Big Stopper 
    • 8 SD Cards
    • 2 Cardreaders
    • Portable harddrive
    • 2 x Spare Batteries
    • 2 x Battery Chargers
    • 3 x Cleaning Cloths
    • 2 x Power converters
    • Netbook power supply
    • Power lead for battery chargers
    • Waterproof cover
  • Lid Pockets
    • 3 x iPhone power cables
    • Kindle power cable
    • 2 x remote releases
    • HDD Cable
    • Tripod straps
  • Front tripod Pocket
    • Trek Towel for those damp days
  • Side Pockets
    • Nothing!
I kept the side pockets clear so that I could use them for water bottles on hikes,etc.  Due to the way I constantly changed the packing of the bag to meet the changing demands of the trip I left the front outside organiser pockets empty to make it easier to change things around and so I could put my wallet and keys in there on walks.

I have been trying to think of anything I would change about this bag and I really can't.

David Langan is photographer of the month for March

David Langan is a landscape photographer based in Aberdeen.  His images reveal his overriding passion for the pure unsullied landscape, a landscape devoid of the apparent hand of man. His website is well worth a visit.


 Highland Harmony
by David Langan


Previous  Photographers of the Month

Wednesday, 1 February 2012

Coltrane Koh is photographer of the month for February

Our photographer for February is Coltrane Koh.  His website shows a versatility for a huge range of  subjects,   am sure there is something for everyone at http://www.coleshot.co.uk/


The Blissed Days Of Snow
by Coltrane Koh


Previous  Photographers of the Month