The other day I hadn't noticed that the power lead had dropped out of my laptop when the battery was already virtually empty. It had so little power left so that instead of hibernating, it just died on me. In the middle of a Lightroom session.
The problem came that when I restarted Lightroom was not in a happy state. It had returned to default and had forgotten all my presets, plugins and export settings. Luckily I could drag them back from a backup but it was a bit of a pain. So I was interested to find this Lightroom configuration backup plug-in, which creates a zip file of all your settings and can be setup to do it automatically.
Another feature of it is the ability to zip up your catalogue backups, which if you combined it with my tip on how to automatically delete old backups could really save some disk space.

Showing posts with label Lightroom. Show all posts
Showing posts with label Lightroom. Show all posts
Wednesday, 11 January 2012

Saturday, 2 July 2011
Vision and Voice: Refining Your Vision in Adobe Photoshop Lightroom - a book review
I have just finished reading Vision and Voice: Refining Your Vision in Adobe Photoshop Lightroom by David DuChemin and found it to be a generally excellent book.
The book is not a full blown guide to Lightroom, you won't find any thing about the library module, printing or slideshow. Tthis is a book dedicated to getting the best out of your pictures using the development module. The book begins with some text which basically boils down to "develop a view of the world you want to communicate" and then it is straight into an overview of the development module.

The overview is then followed by the real meat of the book, where David takes 20 images and explores how to develop them in Lightroom. Each image starts with a zeroed raw file of one of David's shots,which you can download from the web so you can try the instructions out yourself. Once you have the raw file it then shows each of the steps David goes through to achieve his desired result. The style is always to talk about what it is he is try to achieve in visual terms and how to achieve it rather than to get obsessed with the options. It gives you a pretty good idea of what a slider does and why he decided to move a particular slider at that particular time.
What I really liked is the way he takes a raw file, which is already pretty good, and just tries to get the best out of it. There is no manipulation just for the sake of it or rescuing a poor image here, just the digital equivalent of developing a shot in the darkroom. As the lessons progress, he gives the Develop module a pretty good workout and took me in to areas like HSL & split toning where I had never really seen much point in going to before.
The only downside I could find with the book was that the lessons can get slightly repetitive as most pictures need the same beginning adjustments. But if you work along with each picture or try them out on your own images this is needed (and helpful) to make sense of the process.
Overall this is an excellent book and recommended for all those Lightroom users who want to get the best out of their images.
by David DuChemin and found it to be a generally excellent book.The book is not a full blown guide to Lightroom, you won't find any thing about the library module, printing or slideshow. Tthis is a book dedicated to getting the best out of your pictures using the development module. The book begins with some text which basically boils down to "develop a view of the world you want to communicate" and then it is straight into an overview of the development module.
The overview is then followed by the real meat of the book, where David takes 20 images and explores how to develop them in Lightroom. Each image starts with a zeroed raw file of one of David's shots,which you can download from the web so you can try the instructions out yourself. Once you have the raw file it then shows each of the steps David goes through to achieve his desired result. The style is always to talk about what it is he is try to achieve in visual terms and how to achieve it rather than to get obsessed with the options. It gives you a pretty good idea of what a slider does and why he decided to move a particular slider at that particular time.
What I really liked is the way he takes a raw file, which is already pretty good, and just tries to get the best out of it. There is no manipulation just for the sake of it or rescuing a poor image here, just the digital equivalent of developing a shot in the darkroom. As the lessons progress, he gives the Develop module a pretty good workout and took me in to areas like HSL & split toning where I had never really seen much point in going to before.
The only downside I could find with the book was that the lessons can get slightly repetitive as most pictures need the same beginning adjustments. But if you work along with each picture or try them out on your own images this is needed (and helpful) to make sense of the process.
Overall this is an excellent book and recommended for all those Lightroom users who want to get the best out of their images.
Sunday, 29 May 2011
Black and White in lightroom
2011 so far has been a rubbish year for photography for me. I was laid up with a really nasty bought of Pneumonia at the beginning of the year and as soon as I was feeling well the sky became a thick featureless mass of cloud. I managed to snap my LEE big stopper into 3 bits - even though it has hardly left my bag for months. After managing a decent weeks shooting in Derbyshire I am now suffering with eye problems which make photography difficult and driving anywhere to take shots impossible.
In a desperate attempt to produce some pictures, I decided to take a look at last years photos and see if they looked any good in black and white:
In Lightroom I selected every shot I took last year, which is easy enough to do as I have my pictures automatically stored into folders for each year, so it is simply a question of navigating to the correct folder and using ctrl + A to select all the images.
I then decide to create a new collection of these images as virtual copies. Virtual copies are a duplication of your picture but they don’t exist as actual photos, they are simply stored as a new set of settings in the catalog.You can create as many virtual copies of a master photo as you wish so you can have color, sepia, B&W and different crops of the same picture yet all you are storing is a recipy of yur changes to the original file.
So having created my new collection I select all of the images (ctrl+A) and desaturate them (V). The I selected Library>Previews>render standard size previews which will speed up the viewing process later. This takes quite a while with an entire years images, so I left it running overnight.
Now I have a complete collection of last years shots, so I work my way through them using the arrow key, X to mark as a reject and P for my picks. I whittled 3,600 images down to 9 I liked in B&W which I then saved as tiffs to give some sort of permanence to the virtual images.
Below are a few of those shots I thought you might like.
 |
| A new collection as virtual copies |
In Lightroom I selected every shot I took last year, which is easy enough to do as I have my pictures automatically stored into folders for each year, so it is simply a question of navigating to the correct folder and using ctrl + A to select all the images.
I then decide to create a new collection of these images as virtual copies. Virtual copies are a duplication of your picture but they don’t exist as actual photos, they are simply stored as a new set of settings in the catalog.You can create as many virtual copies of a master photo as you wish so you can have color, sepia, B&W and different crops of the same picture yet all you are storing is a recipy of yur changes to the original file.
So having created my new collection I select all of the images (ctrl+A) and desaturate them (V). The I selected Library>Previews>render standard size previews which will speed up the viewing process later. This takes quite a while with an entire years images, so I left it running overnight.
Now I have a complete collection of last years shots, so I work my way through them using the arrow key, X to mark as a reject and P for my picks. I whittled 3,600 images down to 9 I liked in B&W which I then saved as tiffs to give some sort of permanence to the virtual images.
Below are a few of those shots I thought you might like.
 |
| Curbar Fence |
 |
| Down in the Tube Station at Midnight |
 |
| Dawn in the Meadows |
 |
| Trebarwith Strand |
Thursday, 17 March 2011
Lightroom: Just Do It!..........but create a collection first
Sometimes I can be really dim. I have been using Lightroom for ages now and it has only just dawned on me what I should be doing.
Usually when I look through my Lightroom catalogue it is with some sort of purpose in mind. I might be selecting pictures to go into a competition or to send to a magazine, or maybe even just those I think might be "worth a print". The trouble is, I will often select the pictures, process them and forget all about them. So if in a months time I want to get hold of all the images I sent to a particular magazine, I would have to hope that I could find it in my emails, or the directory I exported the files to - or more usually just desperately try to remember them.
My "purpose" for selecting a group of images is useful information and its pretty obvious I may need that information in the future. Basically, I have been throwing away information....that makes me a very bad Lightroom user. The whole point of having a computer is for it to store information for me.
So, now I have decided to make it a rule to always create a collection to store the images I am selecting. The collection should describe my purpose in selecting the images. If I start getting swamped in collections, I can group them into collection groups like "competitions" and "magazine submissions".
Hopefully this level of organisation will save a lot of desperate searching and head scratching in futre.
Here's hoping!
Usually when I look through my Lightroom catalogue it is with some sort of purpose in mind. I might be selecting pictures to go into a competition or to send to a magazine, or maybe even just those I think might be "worth a print". The trouble is, I will often select the pictures, process them and forget all about them. So if in a months time I want to get hold of all the images I sent to a particular magazine, I would have to hope that I could find it in my emails, or the directory I exported the files to - or more usually just desperately try to remember them.
My "purpose" for selecting a group of images is useful information and its pretty obvious I may need that information in the future. Basically, I have been throwing away information....that makes me a very bad Lightroom user. The whole point of having a computer is for it to store information for me.
So, now I have decided to make it a rule to always create a collection to store the images I am selecting. The collection should describe my purpose in selecting the images. If I start getting swamped in collections, I can group them into collection groups like "competitions" and "magazine submissions".
Hopefully this level of organisation will save a lot of desperate searching and head scratching in futre.
Here's hoping!
Wednesday, 26 January 2011
How to add a Google map to your photography site
I recently (well not that recently, but I'm just catching up with a lot of things), received an email asking how I had got Google Maps on my websites. The maps I am talking about are like this one on Images Of Essex and this at Images of Suffolk.
Fortunately both websites are Foliopic sites. Foliopic have a great system where you can keyword your images and search for the image, the URL for this search can then be used as a gallery.
For example keywording all our images and issuing a search for Orford gives this search: http://www.imagesofsuffolk.com/search/gallery/orford which can be used as an Orford gallery.
Other hosting sites may have a similar system, or you will just have to create galleries for each area
To add galleries, pick a point on the map then give it a name so you can change it later if you need to.
In the code box paste in something like:
and change
http://www.imagesofsuffolk.com/search/gallery/orford
to the url for your gallery and Orford to the name of the gallery
Repeat the above process for each gallery then save the map.
In Mapmaker click the Get Javascript button then paste your Google Api key in here
Now you can copy all the javascript ready to paste it onto your site.
Create a new page and click on the source button so you can see the HTML that makes up the page.
Delete all the HTML that is there currently and paste in the HTML from mapmaker.
Remove this block from the top:
And this from the bottom
Step 1 - Create the Galleries
The first thing you need to do is to actually create the galleries you will be linking your map to.Fortunately both websites are Foliopic sites. Foliopic have a great system where you can keyword your images and search for the image, the URL for this search can then be used as a gallery.
For example keywording all our images and issuing a search for Orford gives this search: http://www.imagesofsuffolk.com/search/gallery/orford which can be used as an Orford gallery.
Other hosting sites may have a similar system, or you will just have to create galleries for each area
Step 2 - Create The Map
I used http://mapmaker.donkeymagic.co.uk/ to automatically generate the API code for me. It is worth registering with the site as this allows you to save maps and you will be coming back to this time & time again as you add new points to the map.To add galleries, pick a point on the map then give it a name so you can change it later if you need to.
In the code box paste in something like:
<b><a href="http://www.imagesofsuffolk.com/search/gallery/orford"><b>Orford </b>Gallery</a></b>
and change
http://www.imagesofsuffolk.com/search/gallery/orford
to the url for your gallery and Orford to the name of the gallery
Repeat the above process for each gallery then save the map.
Step 3 Get your own api key:
To use Google maps you need to have your own API key. This is simple enough, go to http://www.google.com/apis/maps/signup.html to sign up and then copy the key.In Mapmaker click the Get Javascript button then paste your Google Api key in here
<!-- //Change the following line to use your own key available from http://www.google.com/apis/maps/signup.html -->


<script src="http://maps.google.com/maps?file=api&v=2&key=ABQIAAAARKYMX3qABRwgBGTOLfvdgBT2yXp_ZAY8_ufC3CFXhHIE1NvwkxTmhS_LQj6knfNR9GOtLZ_JFxncNQ" type="text/javascript"></script>
Now you can copy all the javascript ready to paste it onto your site.
Step 4 Create a new page
These instructions are specific to FoliopicCreate a new page and click on the source button so you can see the HTML that makes up the page.
Delete all the HTML that is there currently and paste in the HTML from mapmaker.
Remove this block from the top:
<div style="background-color: #fff2cc;">
&title>Simple Google map</title>
And this from the bottom
<style type="text/css">
div#popup {
background:#EFEFEF;
border:1px solid #999999;
margin:0px;
padding:7px;
width:270px;
}
</style>
</head>
<body>
<div id="map" style="width:600px;height:450px"></div>
</body>
</html>
Step 5 - Styling your map:
Add the following to your css file.
/************** MAP *******************/
#popup {
background:#EFEFEF;
border:1px solid #999999;
margin:0px;
padding:7px;
width:270px;
}
#popup a
{
color:black;
}
#popup a:hover
{
color:black;
}
Friday, 13 August 2010
Using Smart Collections to improve your Lightroom Workflow
Sometimes life involves some waiting around. You find yourself waiting for news from hospitals and other such places, not really able to concentrate on anything important yet trying to find something to do to pass the time.
Fairly recently I found myself in such a situation and looking for something to do to pass the time. Flicking around Lightroom I came across the smart Collection called "Without Keywords". I thought that most of my image collection was keyworded, boy was I wrong. There were 15,000 pictures in that collection!
If you ever need something mind numming and repetitive to do, I can recommend keywording 15,000 pictures.
So how had this happened? I have quite a thought out and orderly workflow, but I must be missing stuff.
Though a lot of the problem stuff was from an older time before I got more disciplined.
It seems that I need a way to check that I am sticking to my processes and the "without Keywords" smar collection got me thinking. Why not define my entire archive process a series of smart collections.
So, how do I create a smart collection that lets me know if I have forgotten to put a location against any of my photos. Well I have my location keywords in a big hierarchical structure based in a root keyword of "Places":
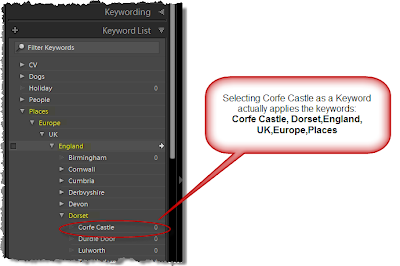
So if I create a smart collection like this:

Any pictures that appear in it have not had a place added on the keywords.
I have created a series of smart collections that allow me to see easily how far I am through my archival process:

Some of the smart collections are simply place holders to remind me to do stuff:

Fairly recently I found myself in such a situation and looking for something to do to pass the time. Flicking around Lightroom I came across the smart Collection called "Without Keywords". I thought that most of my image collection was keyworded, boy was I wrong. There were 15,000 pictures in that collection!
If you ever need something mind numming and repetitive to do, I can recommend keywording 15,000 pictures.
So how had this happened? I have quite a thought out and orderly workflow, but I must be missing stuff.
Though a lot of the problem stuff was from an older time before I got more disciplined.
It seems that I need a way to check that I am sticking to my processes and the "without Keywords" smar collection got me thinking. Why not define my entire archive process a series of smart collections.
So, how do I create a smart collection that lets me know if I have forgotten to put a location against any of my photos. Well I have my location keywords in a big hierarchical structure based in a root keyword of "Places":

So if I create a smart collection like this:

Any pictures that appear in it have not had a place added on the keywords.
I have created a series of smart collections that allow me to see easily how far I am through my archival process:

Some of the smart collections are simply place holders to remind me to do stuff:

Wednesday, 12 May 2010
Why Two Lightroom Catalogs ?
Following my post on automatically deleting Lightroom backups, I was asked why I have two different Lightroom catalogs. Well the reason for this is that I like to separate my recent images from my archive of images.
My working catalogue contains the images I am currently working on and the archive contains images that are finished. Once a month I move the images from the previous month to the archive.
There are a few reasons for me working in this way. The first is that I find the process of archiving images stops me constantly looking at shots to see if there is any way I can improve them. If I didn't do that I would still be looking at shots I took in may 2006 thinking "I wonder what that looks like in B&W".
The other main reason, is that it is really easy to put off keywording and classifying images, as part of the archival process I like to make sure that they are all classified correctly. My checklist for archiving is:
My working catalogue contains the images I am currently working on and the archive contains images that are finished. Once a month I move the images from the previous month to the archive.
There are a few reasons for me working in this way. The first is that I find the process of archiving images stops me constantly looking at shots to see if there is any way I can improve them. If I didn't do that I would still be looking at shots I took in may 2006 thinking "I wonder what that looks like in B&W".
The other main reason, is that it is really easy to put off keywording and classifying images, as part of the archival process I like to make sure that they are all classified correctly. My checklist for archiving is:
- Delete all the images that don't make the grade
- Keyword every image with the location it was taken
- Keyword any shots to identify any dogs & people.
- Apply Star ratings.
- Add Title & Descriptions to the good ones.
- ctrl + A and ctrl + s to write the metadata to the files
- Export the files to a new library
- Import in to the Archive.
- Add pictures to the collections for my various websites
Monday, 12 April 2010
Deleting old Lightroom backups
Lightroom is a nicely thought out application and one of it's nice thoughts is that it reminds you to backup your Lightroom database on a regular basis. This is a good thing, you should listen to it's advice and make sure you take those backups regularly.
If you always cancel out of the backup dialogue, or worst still have disabled it ,just delete your Lightroom catalogue now. This will save all the hassle of waiting till something goes wrong with your hardware/software/mind. Always, always make sure you have a backup.
The only problem with the Lightroom backup system is that it can start to fill up your hard disk with lots of old copies of your catalogues. It would be nice if there was away to automatically limit it to only keeping 2 months or so worth of backups. Well after a quick bit of fettling I worked out a way to do this.
The instructions below are for windows PCs, if you've got a Mac there is probably some animated icon of Steve jobs you can click on and all your problems will be solved.
1.First identify what directories you are backing up to. These are usually in a folder called Backups inside the directory where your caltalouge lives In my case they are:
D:\Catalogs\Lightroom\Backups
and
D:\Catalogs\Lightroom\Archive\Backups
2. Open Notepad:
3. Paste in the following code:
replace D:\Catalogs\Lightroom\Backups with path to your backups you found in step 1
Repeat for each of the folders you found in step 1.
My final file looks like this:
Note: the -60 at the end means "delet backups older than 60 days" you can edit this to any number of days you like.
3. Save the file as DeleteLRBackups.bat (the .bat bit is very important) in a c:\batch folder (if you don't have one create it).
4. Now all you need to do is schedule this as a task to run whenever you like.
If you always cancel out of the backup dialogue, or worst still have disabled it ,just delete your Lightroom catalogue now. This will save all the hassle of waiting till something goes wrong with your hardware/software/mind. Always, always make sure you have a backup.
The only problem with the Lightroom backup system is that it can start to fill up your hard disk with lots of old copies of your catalogues. It would be nice if there was away to automatically limit it to only keeping 2 months or so worth of backups. Well after a quick bit of fettling I worked out a way to do this.
The instructions below are for windows PCs, if you've got a Mac there is probably some animated icon of Steve jobs you can click on and all your problems will be solved.
1.First identify what directories you are backing up to. These are usually in a folder called Backups inside the directory where your caltalouge lives In my case they are:
D:\Catalogs\Lightroom\Backups
and
D:\Catalogs\Lightroom\Archive\Backups
2. Open Notepad:
- In XP choose Start>Run and type notepad click OK.
- in Vista/Windows 7 just type notepad in the search box & click on the notepad icon
3. Paste in the following code:
forfiles /p "D:\Catalogs\Lightroom\Backups" /c "cmd /c rd @file /s /q" /d -60
replace D:\Catalogs\Lightroom\Backups with path to your backups you found in step 1
Repeat for each of the folders you found in step 1.
My final file looks like this:
forfiles /p "D:\Catalogs\Lightroom\Backups" /c "cmd /c rd @file /s /q" /d -60

forfiles /p "D:\Catalogs\Lightroom\Archive\Backups" /c "cmd /c rd @file /s /q" /d -60
Note: the -60 at the end means "delet backups older than 60 days" you can edit this to any number of days you like.
3. Save the file as DeleteLRBackups.bat (the .bat bit is very important) in a c:\batch folder (if you don't have one create it).
4. Now all you need to do is schedule this as a task to run whenever you like.
Saturday, 6 March 2010
2009 Portfolio Updated
It's been a real busy start to the the year and things seem to be showing no sign of slowing down any-time soon. It's only taken till the beginning of March to get round to completing last years gallery.
The delay was mainly because I have been experiencing the joys of getting Lightroom to generate my galleries for me. When I get a moment I will produce some blogs explaining what I have learnt for anyone else brave enough to delve into the Lightroom SDK.
The 2009 Gallery includes images from across England and I hope you find something there you enjoy looking at.

Lost In The Mist
The delay was mainly because I have been experiencing the joys of getting Lightroom to generate my galleries for me. When I get a moment I will produce some blogs explaining what I have learnt for anyone else brave enough to delve into the Lightroom SDK.
The 2009 Gallery includes images from across England and I hope you find something there you enjoy looking at.
Lost In The Mist
Wednesday, 28 October 2009
Lightroom Archive format - TIFF or PSD ?
Having established that it would be a good idea to save the result of any editing I do in Lightroom in to an archival format, an email flooded in asking why I chose tiff format rather than psd.
Well my gut feel is that tiff is a well understood format supported by lots of vendors, whereas psd seems to be a bit more tied into Photoshop. But my guts and their feelings are not of interest to most right thinking people. So I can do no better than quote this post by Jeff Schewe:
If only Jeff wouldn't sit on the fence so much, we would know what he really felt about the matter!
Well my gut feel is that tiff is a well understood format supported by lots of vendors, whereas psd seems to be a bit more tied into Photoshop. But my guts and their feelings are not of interest to most right thinking people. So I can do no better than quote this post by Jeff Schewe:
.PSD is now a bastardized file format that is NOT a good idea to use. Even the Photoshop engineers will tell you that PSD is no longer the Photoshop "native" file format. It has no advantages and many disadvantages over TIFF.
TIFF is publicly documented, PSD is not. That makes TIFF a preferred file format for the long term conservation of digital files.
TIFF uses ZIP compression for max compression, PSD uses RLE which if you save without the Max compatibility will be a bit smaller, but at the risk of not being able to be used by apps, like Lightroom.
TIFF can save EVERYTHING a PSD can save including layers, paths, channels, transparency, annotations and can go up to 4 GIGS in file size. TIFF can save all the color spaces PSD can. The ONLY thing I can think of that PSD can save that currently TIFF can't save is if you Save out of Camera Raw a cropped PSD, you can uncrop the PSD in Photoshop CS, CS2 or 3. That's one tiny obscure thing that PSD can do that TIFF currently doesn't. How many people even knew that let alone use it?
PSD used to be the preferred file format back before Adobe bastardized it for the Creative Suite. The moment that happened, PSD ceased to be a Photoshop "native" file format. PSB is the new Photoshop "native" file format for images beyond 30,000 pixels. And , at the moment, only Photoshop can open a PSB.
Getting back to the fist point, Adobe can do anything including stopping support for PSD because it's a proprietary file format. TIFF is public, even if it's owned by Adobe (by virtue of the Aldus purchase). Even if Adobe went belly up tomorrow, TIFF would continue.
And, let me be blunt, anybody who thinks PSD is "better" than TIFF is ignorant of the facts. If Adobe would let them, the Photoshop engineers would tell you to quit using PSD. Lightroom for the first beta did NOT support PSD and Hamburg fought tooth and nail to prevent having to accept PSD. He blinked, but you still can't import a PSD without Max compat enabled-which basically makes it a TIFF with a PSD extension.
Look, I'll make it REAL simple...
TIFF = Good
PSD = Bad
Ok?
If only Jeff wouldn't sit on the fence so much, we would know what he really felt about the matter!
Friday, 23 October 2009
Lightroom - Do I need to save my edited shots?
So, as regular readers will be aware, I am slowly moving my workflow to Lightroom. It's a fun project and has given me the opportunity to reassess the way I currently work & compare it with other photographers.
My goal, is to follow "best practice" for digital image management whilst minimising the amount of work I actually have to do in front of the computer. So I am spending a lot of time reading blogs, books & forum posts as to how others manage their workflow and working out which will be right for me.
One of the considerations a digital photographer has to take into account is how many copies of each image to store. If you are not careful it can easily become a nightmare. First you have your original raw file. Then you might have one or two tiff files associated with it as your finally developed image. Finally you end up with s numerous jpgs sized for various output mediums (web, print, magazine submissions, etc). If your not careful it could all end up looking like the tide line on a Cornish Beach:
 Cornish Crap
(Click to view large)
A while back I decided that I would only keep the original raw file & the finished tiff file for each of my images. Using QImage I could print the tiff file in any size I choose, so there was no need to store versions at different print sizing. Jpgs are really just an output format, so I don't keep them as they can be recreated at any time from the tiffs.
So for a long time I have had only one version of my images (the tiff) , I kept the raw files so I can go back to the raws if I need to, and all is right with the world. But then along came Lightroom2 and it's targeted adjustments...
One of the big things that you hear about Lightroom2 is that it features "Non-destructive editing" . Unlike photoshop, your original image is safe no matter what you do to it as all that is stored is your original image and a history of the changes you made to it. In order to undo something you just go back as far a you like in that history. For people who shoot jpgs this is a major advance - your originals are safe with Lightroom. For Raw shooters it's really not such a big deal, no raw converter changes your raw files, they simply generate a tiff or a jpg.
But Lightroom's target adjustments change the rules. You can (in a lot of circumstances) just use the Lightroom tools to make the adjustments and never need to go into Photoshop. From Lightroom I can print, show it in a slide-show and even generate any jpgs I might need to send out. So now I only need Lightroom and my raw files - it's time to say goodbye to storing tiff files. This has to be a good thing...doesn't it?
Well as i see it Lightroom is storing a set of instructions on what to do with your image very much like a recipe book tells you what to do with raw ingredients. As we know with recipes, two cooks can follow the same recipe and produce 2 different results, or if the recipe is in English and the chef only speaks French you are going to have lots of problems. Does the same hold true for the recipes we have in Lightroom? Well yes I believe it does.
If our recipe for the perfect picture includes the instruction "increase vibrancy by 30", none of us outside of Adobe really know what calculations Lightroom performs on our files. In a few years time when you are running Lightroom 5.3 on Windows 11 (or OS-X Domestic Moggy or even Google Spangled Metal 3), you have no real guarantee that "increase vibrancy by 30" will produce the same look as it did back in 2009. I am sure Adobe would do their best to keep things consistent but it's not easy to guarantee that as developers try to fix bugs in the code and extend it to add more functionality.
Even more importantly, what happens if Adobe drop support for Lightroom due to it rapidly losing market share to some other new technology coming along? What if it becomes to costly to continue to support the raw format of your files? Now we are in a much, much worse position than we ever were, as now we have an archive of raw files in a proprietary format plus a set of instructions in an equally proprietary format that it may be difficult (if not impossible) to get any other software to understand.
That's why, to me, storing raw + lightroom adjustments is just not an archival format as it cannot be opened by other applications and may produce different result over time. Tiff files I created 5 years ago in Photoshop 7 still open and print just as they always did and I can use a wide variety of software to access them. It's an open and widely used standard, so I think I will be sticking with Tiff files as my format for the moment.
Am I right? why not add a comment below & let me know what you think.
My goal, is to follow "best practice" for digital image management whilst minimising the amount of work I actually have to do in front of the computer. So I am spending a lot of time reading blogs, books & forum posts as to how others manage their workflow and working out which will be right for me.
One of the considerations a digital photographer has to take into account is how many copies of each image to store. If you are not careful it can easily become a nightmare. First you have your original raw file. Then you might have one or two tiff files associated with it as your finally developed image. Finally you end up with s numerous jpgs sized for various output mediums (web, print, magazine submissions, etc). If your not careful it could all end up looking like the tide line on a Cornish Beach:
 Cornish Crap
(Click to view large)
A while back I decided that I would only keep the original raw file & the finished tiff file for each of my images. Using QImage I could print the tiff file in any size I choose, so there was no need to store versions at different print sizing. Jpgs are really just an output format, so I don't keep them as they can be recreated at any time from the tiffs.
So for a long time I have had only one version of my images (the tiff) , I kept the raw files so I can go back to the raws if I need to, and all is right with the world. But then along came Lightroom2 and it's targeted adjustments...
One of the big things that you hear about Lightroom2 is that it features "Non-destructive editing" . Unlike photoshop, your original image is safe no matter what you do to it as all that is stored is your original image and a history of the changes you made to it. In order to undo something you just go back as far a you like in that history. For people who shoot jpgs this is a major advance - your originals are safe with Lightroom. For Raw shooters it's really not such a big deal, no raw converter changes your raw files, they simply generate a tiff or a jpg.
But Lightroom's target adjustments change the rules. You can (in a lot of circumstances) just use the Lightroom tools to make the adjustments and never need to go into Photoshop. From Lightroom I can print, show it in a slide-show and even generate any jpgs I might need to send out. So now I only need Lightroom and my raw files - it's time to say goodbye to storing tiff files. This has to be a good thing...doesn't it?
Well as i see it Lightroom is storing a set of instructions on what to do with your image very much like a recipe book tells you what to do with raw ingredients. As we know with recipes, two cooks can follow the same recipe and produce 2 different results, or if the recipe is in English and the chef only speaks French you are going to have lots of problems. Does the same hold true for the recipes we have in Lightroom? Well yes I believe it does.
If our recipe for the perfect picture includes the instruction "increase vibrancy by 30", none of us outside of Adobe really know what calculations Lightroom performs on our files. In a few years time when you are running Lightroom 5.3 on Windows 11 (or OS-X Domestic Moggy or even Google Spangled Metal 3), you have no real guarantee that "increase vibrancy by 30" will produce the same look as it did back in 2009. I am sure Adobe would do their best to keep things consistent but it's not easy to guarantee that as developers try to fix bugs in the code and extend it to add more functionality.
Even more importantly, what happens if Adobe drop support for Lightroom due to it rapidly losing market share to some other new technology coming along? What if it becomes to costly to continue to support the raw format of your files? Now we are in a much, much worse position than we ever were, as now we have an archive of raw files in a proprietary format plus a set of instructions in an equally proprietary format that it may be difficult (if not impossible) to get any other software to understand.
That's why, to me, storing raw + lightroom adjustments is just not an archival format as it cannot be opened by other applications and may produce different result over time. Tiff files I created 5 years ago in Photoshop 7 still open and print just as they always did and I can use a wide variety of software to access them. It's an open and widely used standard, so I think I will be sticking with Tiff files as my format for the moment.
Am I right? why not add a comment below & let me know what you think.
Tuesday, 29 September 2009
Using Relative Paths in Lightroom part 3
If I only understood what it is the Lightroom team have against relative paths, I would be a happy man. They seem to have gone well out of their way to make life really difficult. We have huge amounts of flexibility when naming files. File names can have any number of different bits of exif and xmp data embedded in them, but ask for the subfolder to support a simple ../ comand and it all goes horribly wrong.
Having done battle to get editing to support relative paths. The final place where I need LR to support relative paths is on export. This would seem a simple thing as there on the screen is an option to output to a subdirectory. Naively I figured if I entered the subdirectory as ../WebReady lightroom would happily plonk it in a sibling folder next to my raw files. But it was not to be, the entry goes red and I get told I can't use those characters. Why the blinky flip not? The Adobe relative path police strike again!
But a bit of thinking and a read of Inside Lightroom gave me an idea. So this is how you get round the problem.
First create your export with all the settings you need in it. Select Put in a subfolder and enter the subfolder name without any pathing characters (./ etc)

Now save that as an export preset - in my case I called it Screen Previews 1024x768, You will find that this has created a file in the presets folder with the same name as your export and a .lrtemplate extension

All you need to do now is open the file in a text editor and edit the line marked export_destinationPathSuffix. Simply add the required pathing there and save the file.
 Next time you run your export it will happily go to the directory you want. Simples!
Related Posts
Using relative paths in Lightroom part 1
Using relative paths in Lightroom part 2
Having done battle to get editing to support relative paths. The final place where I need LR to support relative paths is on export. This would seem a simple thing as there on the screen is an option to output to a subdirectory. Naively I figured if I entered the subdirectory as ../WebReady lightroom would happily plonk it in a sibling folder next to my raw files. But it was not to be, the entry goes red and I get told I can't use those characters. Why the blinky flip not? The Adobe relative path police strike again!
But a bit of thinking and a read of Inside Lightroom gave me an idea. So this is how you get round the problem.
First create your export with all the settings you need in it. Select Put in a subfolder and enter the subfolder name without any pathing characters (./ etc)
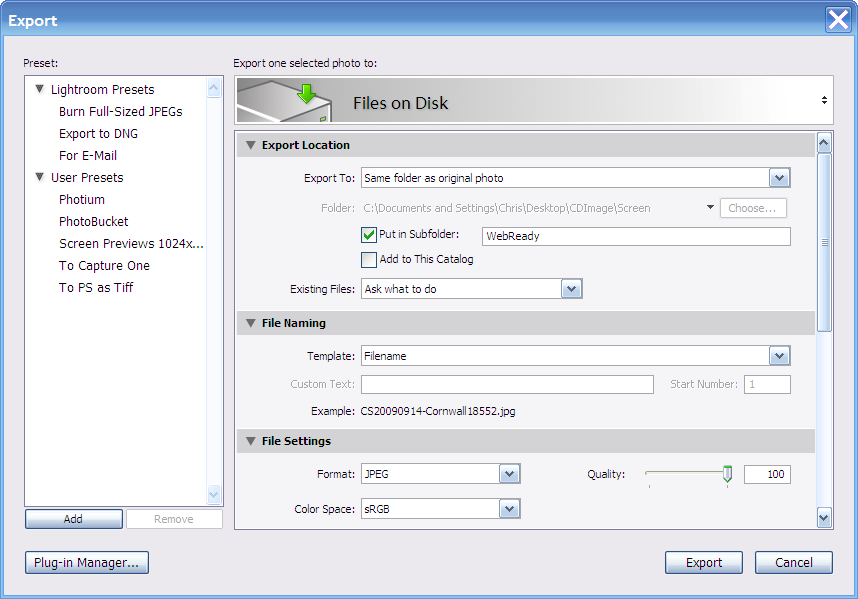
Now save that as an export preset - in my case I called it Screen Previews 1024x768, You will find that this has created a file in the presets folder with the same name as your export and a .lrtemplate extension
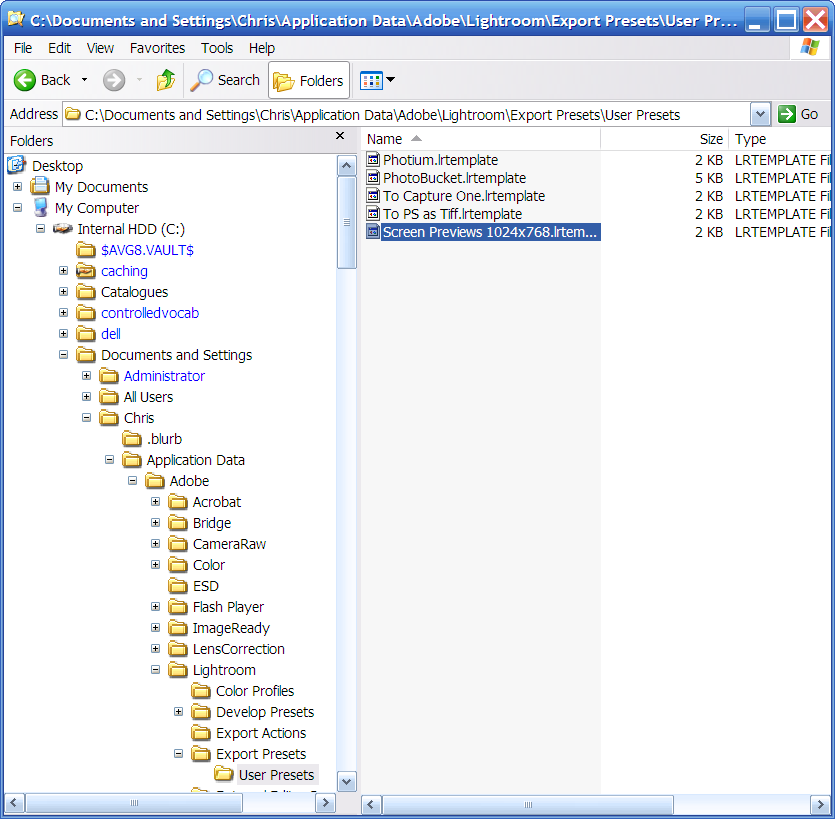
All you need to do now is open the file in a text editor and edit the line marked export_destinationPathSuffix. Simply add the required pathing there and save the file.
 Next time you run your export it will happily go to the directory you want. Simples!
Related Posts
Using relative paths in Lightroom part 1
Using relative paths in Lightroom part 2
Friday, 18 September 2009
Using Relative Paths in Lightroom part 2
In part one of these ramblings I noticed that although you could force Lightroom, kicking and screaming, to use relative paths. It's good friend Photoshop was having none of it.
Not to be discouraged I put on my hacking trousers and through together a solution. If there is anyone out there who cares, here is how you fix the problem:
Download This install file and run it in the normal way (press next at all the prompts) - if you don't have the .Net framework 2.0 installed you will need to download & install that too.
Now nip into Lightroom preferences and create a new External Editor.

You need to hit the browse button and chose the program you have just installed (yes I know DaDoRunRun.exe is a rubbish name bt it was the best I could come up with at the time.
Now when you chose to use this External Editor this dialog box will appear:

Just click Edit and a new dialog pops up.

Click on the browse button (...) and point the program to the right path for Photoshop on your machine. Now click OK and all being well Photoshop will open with the correct file.
This is a bit intrusive so next time you call the editor click on the "don't show me this dialog" button and the box will never appear again.

That's it problem solved! Well except that Lightroom won't stack files in different directories. Now that is a weird limitation, I thought the whole point of Lightroom was that directories weren't that important any more - looks like I'm wrong on that one.
I bet no one ever uses this information but, I still feel I should make it available - as a public service. Of course I am happy for someone to post a comment telling me why relative folders are such an evil concept that they should be banished...
Related Posts
Using relative paths in Lightroom part 1
Not to be discouraged I put on my hacking trousers and through together a solution. If there is anyone out there who cares, here is how you fix the problem:
Download This install file and run it in the normal way (press next at all the prompts) - if you don't have the .Net framework 2.0 installed you will need to download & install that too.
Now nip into Lightroom preferences and create a new External Editor.

You need to hit the browse button and chose the program you have just installed (yes I know DaDoRunRun.exe is a rubbish name bt it was the best I could come up with at the time.

Now when you chose to use this External Editor this dialog box will appear:

Just click Edit and a new dialog pops up.

Click on the browse button (...) and point the program to the right path for Photoshop on your machine. Now click OK and all being well Photoshop will open with the correct file.
This is a bit intrusive so next time you call the editor click on the "don't show me this dialog" button and the box will never appear again.

That's it problem solved! Well except that Lightroom won't stack files in different directories. Now that is a weird limitation, I thought the whole point of Lightroom was that directories weren't that important any more - looks like I'm wrong on that one.
I bet no one ever uses this information but, I still feel I should make it available - as a public service. Of course I am happy for someone to post a comment telling me why relative folders are such an evil concept that they should be banished...
Related Posts
Using relative paths in Lightroom part 1
Tuesday, 15 September 2009
Using Relative paths in Lightroom
A while back I mentioned that I found Lightroom to be a bit "claustrophobic". I hadn't been using the system long when I came across an example of this: I noticed, that when I selected Edit in Photoshop that Lightroom first creates a psd file in the same directory as the raw file then opens this file in Photoshop. This is all well and good but personally I would like to use Tiff format and not have the files in the same directory (I know I'm a control freak).
So I wandered off to the preferences section and there I seem to be able to change the file format (which is great), but not the folder the file is created in (which isn't). So I take a look in the Export options, there I can enter a subfolder but it won't let me enter a relative path it has to be a sub folder….arrgh!
For those that don't know what I am on about a relative path is something like this ../tiffs the two dots mean "up one level" and the slash means go to a sub folder. So in this case we are asking to go to a tiffs folder that has the same parent as our current folder.
Another annoyance is why have different setups for editors and exports? As far as i can see editors are really only a specific type of export, so why configure them in 2 different places?
Most sane people would by now have just let the generated files go into a subfolder and have done with it, but I have been doing things this way for 3 or 4 years now & I don't see why I should change just because someone at Adobe can't be bothered to support relative paths.
So I decided to see if there was a way round the problem and eventually I think I have it sorted.
First go into preferences and click on the external editing tab. Down in the additional external editor section you need to setup the program you want to use and the file format. From the dropdown menu at the top you can then select save current settings as a new preset and name your settings.

Now we need to add a new filename template. Click on the dropdown for filename and create a new preset. This is where you can add a relative path.

Now when I call up an external editor it works just how I want it to…..

…well except Photoshop CS2 - someone at Adobe really hates relative paths. Photoshop doesn’t seem to open the paths with relative addressing in them. Most other applications seem to understand that
C:\Working\2009\08\01\Raw\..\Tiffs\CS20090801-17738.tif
really means
C:\Working\2009\08\01\Tiffs\CS20090801-17738.tif
But Photoshop doesn’t! In part two I'll be detailing my little fix that gets round this problem.
So I wandered off to the preferences section and there I seem to be able to change the file format (which is great), but not the folder the file is created in (which isn't). So I take a look in the Export options, there I can enter a subfolder but it won't let me enter a relative path it has to be a sub folder….arrgh!
For those that don't know what I am on about a relative path is something like this ../tiffs the two dots mean "up one level" and the slash means go to a sub folder. So in this case we are asking to go to a tiffs folder that has the same parent as our current folder.
Another annoyance is why have different setups for editors and exports? As far as i can see editors are really only a specific type of export, so why configure them in 2 different places?
Most sane people would by now have just let the generated files go into a subfolder and have done with it, but I have been doing things this way for 3 or 4 years now & I don't see why I should change just because someone at Adobe can't be bothered to support relative paths.
So I decided to see if there was a way round the problem and eventually I think I have it sorted.
First go into preferences and click on the external editing tab. Down in the additional external editor section you need to setup the program you want to use and the file format. From the dropdown menu at the top you can then select save current settings as a new preset and name your settings.

Now we need to add a new filename template. Click on the dropdown for filename and create a new preset. This is where you can add a relative path.

Now when I call up an external editor it works just how I want it to…..

…well except Photoshop CS2 - someone at Adobe really hates relative paths. Photoshop doesn’t seem to open the paths with relative addressing in them. Most other applications seem to understand that
C:\Working\2009\08\01\Raw\..\Tiffs\CS20090801-17738.tif
really means
C:\Working\2009\08\01\Tiffs\CS20090801-17738.tif
But Photoshop doesn’t! In part two I'll be detailing my little fix that gets round this problem.
Thursday, 10 September 2009
Inside Lightroom 2 - A Book Review
I've just finished reading Inside Lightroom 2: The serious photographer's guide to Lightroom efficiency: The Serious Photographer's Guide to Lightroom Efficiency by Richard Eamey

Its an interesting book that attempts to go further than the simple "how-to" books.
Chapter 1 starts with details of what Lightroom is, and a basic an overview of its functionality and features. It doesn't add too much to your life, but it sets the context for the rest of the book.
Next he goes onto "the ideal system" for Lightroom 2 well, it covers most of what you need to know but it is a relatively shallow description of what you should be looking at. A serious photographer would be better off looking at the The DAM Book as it covers this in much more depth.
Then we get a description of the differences between version 1 of Lightroom and version 2. Although this well written and added to my knowledge on the subject it had the feel of being a bit of padding.
Chapter 4 takes you through how to manage your photos and there is quite a bit of useful information here. This is followed by an example workflow, which is a great way to see how the product is actually used. Though it would be great to see a few more workflows detailed here for different types of photographers: journalists & wedding photographers leap to mind.
After that it is on presets. Clearly this is an area that Richard knows a lot about and explains in great detail. It really shows how presets work, and it even shows you how to edit them in a text editor, which is rather wizzy. This allows you to duplicate some of the tone curve functionality from Adobe Camera Raw. All clever stuff and well worth reading once you really understand Lightroom.
The final chapter details online resources for Lightroom, which is surprisingly useful due to the use of tinyurls and a grouped rss feed that makes it easy to get to grips with what is out there.
At the end of the book, I was left with a feeling that it is excellent in parts and somewhat disappointing in others. Personally I would like to see the workflow and presets sections used as part of a different book "Extending Lightroom 2". This would cover those two subjects as well as, the use of the various plug-ins available, real world issues like how to integrate web galleries into your existing site and a guide to writing your own plug-ins. Now that would be well worth buying.
Pros
Clear layout
Detailed knowledge of Presets
An easy quick read
Cons
Too much padding
More examples needed
by Richard EameyIts an interesting book that attempts to go further than the simple "how-to" books.
Chapter 1 starts with details of what Lightroom is, and a basic an overview of its functionality and features. It doesn't add too much to your life, but it sets the context for the rest of the book.
Next he goes onto "the ideal system" for Lightroom 2 well, it covers most of what you need to know but it is a relatively shallow description of what you should be looking at. A serious photographer would be better off looking at the The DAM Book as it covers this in much more depth.
Then we get a description of the differences between version 1 of Lightroom and version 2. Although this well written and added to my knowledge on the subject it had the feel of being a bit of padding.
Chapter 4 takes you through how to manage your photos and there is quite a bit of useful information here. This is followed by an example workflow, which is a great way to see how the product is actually used. Though it would be great to see a few more workflows detailed here for different types of photographers: journalists & wedding photographers leap to mind.
After that it is on presets. Clearly this is an area that Richard knows a lot about and explains in great detail. It really shows how presets work, and it even shows you how to edit them in a text editor, which is rather wizzy. This allows you to duplicate some of the tone curve functionality from Adobe Camera Raw. All clever stuff and well worth reading once you really understand Lightroom.
The final chapter details online resources for Lightroom, which is surprisingly useful due to the use of tinyurls and a grouped rss feed that makes it easy to get to grips with what is out there.
At the end of the book, I was left with a feeling that it is excellent in parts and somewhat disappointing in others. Personally I would like to see the workflow and presets sections used as part of a different book "Extending Lightroom 2". This would cover those two subjects as well as, the use of the various plug-ins available, real world issues like how to integrate web galleries into your existing site and a guide to writing your own plug-ins. Now that would be well worth buying.
Pros
Clear layout
Detailed knowledge of Presets
An easy quick read
Cons
Too much padding
More examples needed
Monday, 7 September 2009
Export iView/Expressions Media Category Sets to Lightroom Hierachical Keywords
As part of my adventures of moving to a Lightroom world, I've started to look at Keywording. Now the Lightroom Hierachical keywords, seem like a really good thing and although I can easily build up a big set of keywords thanks to The Controlled Vocabulary what I really want is to pull in the hierachy of Catalog Sets I spent ages creating in iView.
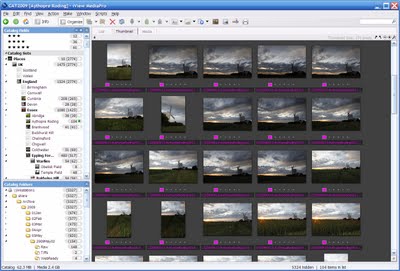 iView Catalog Set hierarchy for places
(click to view large)
As far as I can see the only real way to get this list would be to recreate this in Lightroom manually. As I didn't fancy all that typing I came up with This Script (which is heavily based on John Beardsworths script I used previously)
To use it all you need to do is change one or two lines in the file:
Change this to the name of the catalog set you wish to export:
If you should wish to change the name or location of the file of hierachical keywords you create then this is the line to change.
Once you have edited the file, save it in your iview scripts folder. The Open iview with the catalog containing the sets you wish to export. Run the script from the script folder and after a few seconds you should get a "Done" message.
Open lightroom and select the Library module. Select Metadata>Import Keywords and brows to the file you have created C:\iViewCategories.txt and your Keywords should apear as if by magic:
 Keyword Hierachy in Lightroom
(Click to view large)
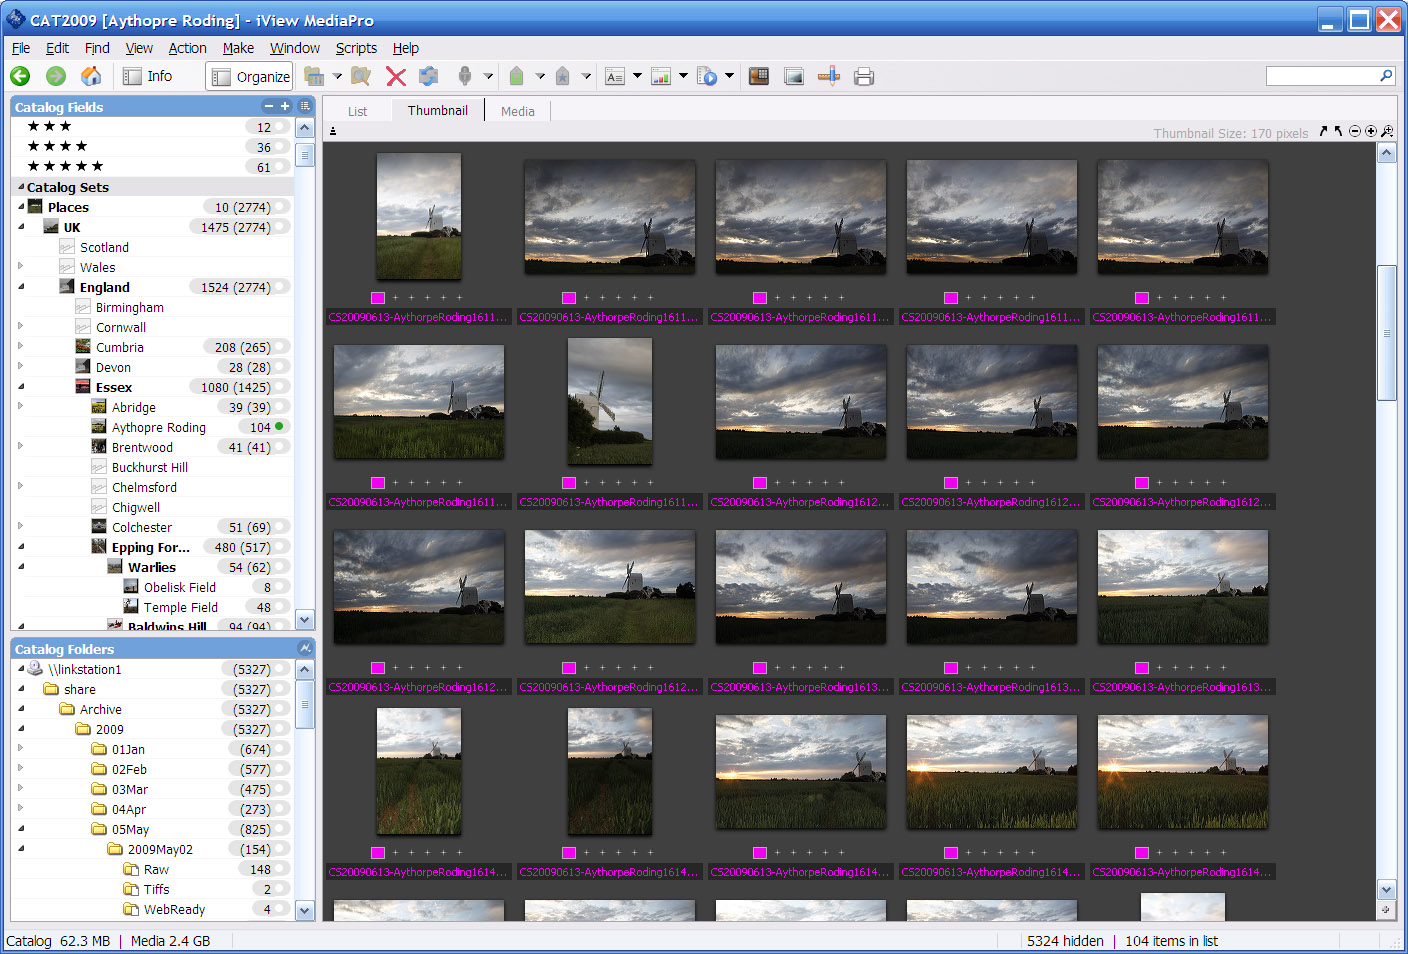 iView Catalog Set hierarchy for places
(click to view large)
As far as I can see the only real way to get this list would be to recreate this in Lightroom manually. As I didn't fancy all that typing I came up with This Script (which is heavily based on John Beardsworths script I used previously)
To use it all you need to do is change one or two lines in the file:
Change this to the name of the catalog set you wish to export:
Const ivKeywordSetName = "Places"
If you should wish to change the name or location of the file of hierachical keywords you create then this is the line to change.
const filePath = "C:\iViewCategories.txt"
Once you have edited the file, save it in your iview scripts folder. The Open iview with the catalog containing the sets you wish to export. Run the script from the script folder and after a few seconds you should get a "Done" message.
Open lightroom and select the Library module. Select Metadata>Import Keywords and brows to the file you have created C:\iViewCategories.txt and your Keywords should apear as if by magic:
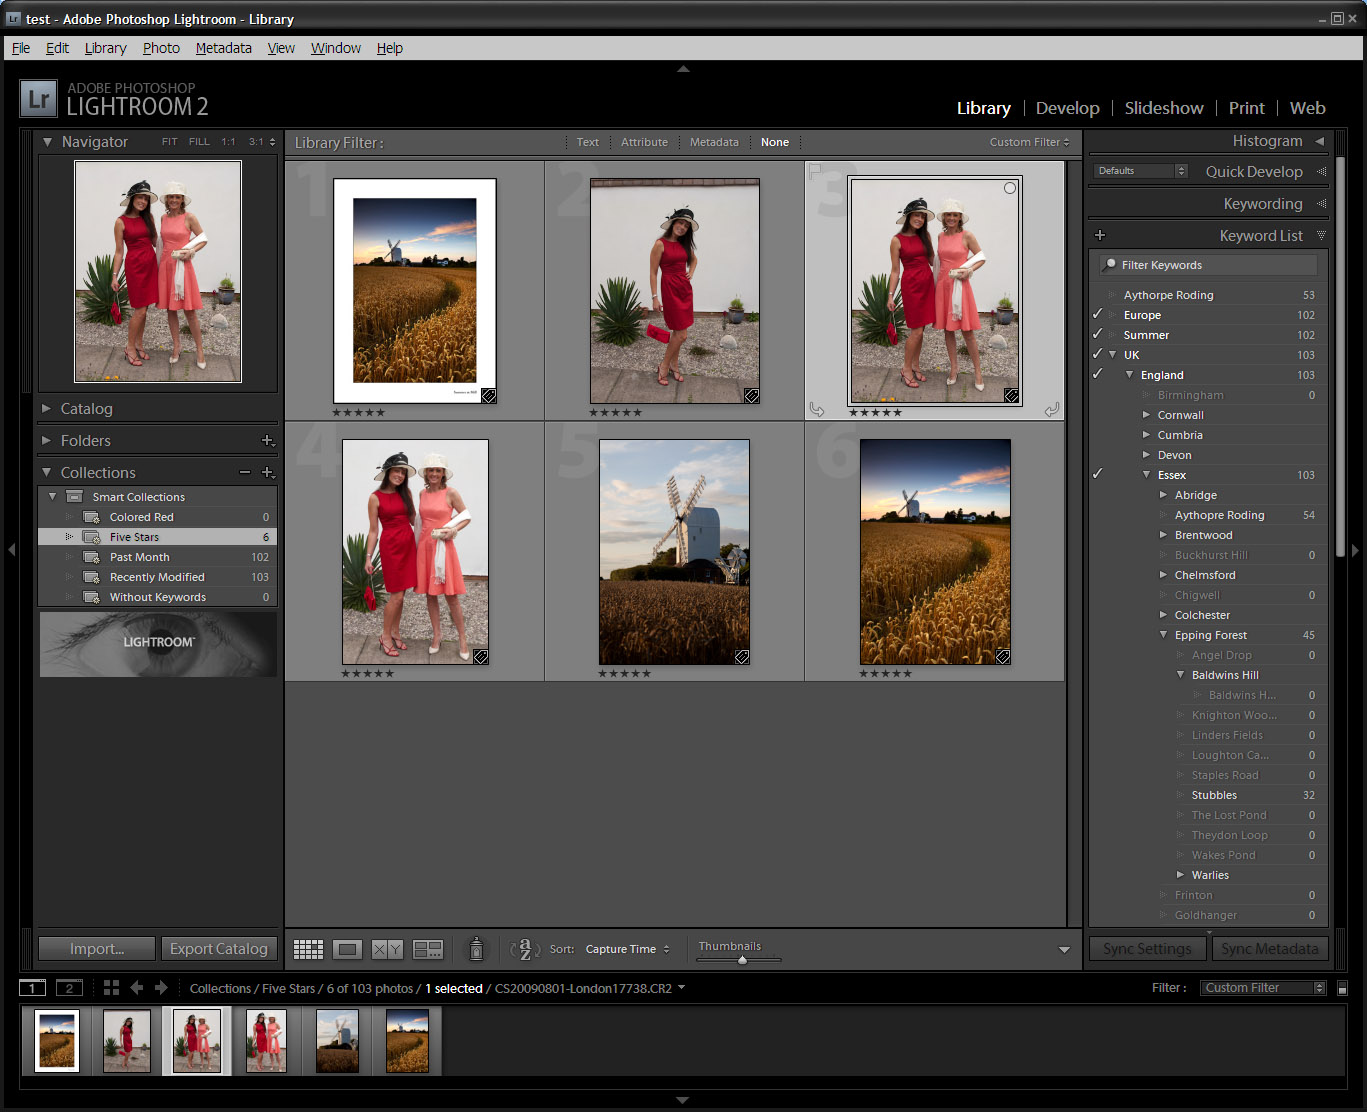 Keyword Hierachy in Lightroom
(Click to view large)
Friday, 28 August 2009
Moving to Lightroom - Sorting the wheat from the chaff
Part of a series of posts detailing my slow move into the brave new world of Adobe Photoshop Lightroom.
I have my photos split between a working area, which holds the current month and a bit photos and an archive of everything else.
The archive is managed with iview, but the working area is managed by a whole mish-mash of tools including Downloader Pro, BreezeBrowser, Capture One, Photoshop, Qimage and a few custom tweaks and scripts.
The working area is where I will be concentrating on using Lightroom.
Once a month I move the previous months photos from working to archive, before I do that I do the following:
1. Delete all the pictures I don't want to keep 2. Add star ratings 3. Ensure all metadata is written to the files correctly
Item 1 was my first candidate for Lightroomification. At the moment it is a relativly simple process of opening each directory in Breezebrowser, running a slideshow (ctrl A, ctrl S), tagging each reject (up arrow), then selecting all rejects (f6) and pressing delete.
So is this any easier in Lightroom? In the Library module I an select the entire months images in one go...which is better. I can then run in "Lights out mode" (L,L) using the arrow keys to move through the images and flag the rejects (x to reject, U if you accidentally rejected something), then use the delete rejects option and you are done.
The big advantage of doing this in Lightroom is you get to see the post-processed images, rather than the jpeg preview you get on Breezebrowser, this can make a lot of difference. There is consequently a delay sometimes in building the previews but it doesn't seem particularly onerous & you don't have to wait for it to complete. I'm not sure what else Adobe do to the previews but they do look really good in LR for some reason.
The only option I really miss from my old way of doing things is a quick B&W view. In breezebrowser I can simply press ctrl+w and the image is displayed in black & white, pressing it again switches to colour. There doesn't seem to be an equivalent to this in Lightroom*.
So far it looks like a win for Lightroom.
*Oh hang on a sec - looks like pressing V does that...marvellous!
I have my photos split between a working area, which holds the current month and a bit photos and an archive of everything else.
The archive is managed with iview, but the working area is managed by a whole mish-mash of tools including Downloader Pro, BreezeBrowser, Capture One, Photoshop, Qimage and a few custom tweaks and scripts.
The working area is where I will be concentrating on using Lightroom.
Once a month I move the previous months photos from working to archive, before I do that I do the following:
1. Delete all the pictures I don't want to keep 2. Add star ratings 3. Ensure all metadata is written to the files correctly
Item 1 was my first candidate for Lightroomification. At the moment it is a relativly simple process of opening each directory in Breezebrowser, running a slideshow (ctrl A, ctrl S), tagging each reject (up arrow), then selecting all rejects (f6) and pressing delete.
So is this any easier in Lightroom? In the Library module I an select the entire months images in one go...which is better. I can then run in "Lights out mode" (L,L) using the arrow keys to move through the images and flag the rejects (x to reject, U if you accidentally rejected something), then use the delete rejects option and you are done.
The big advantage of doing this in Lightroom is you get to see the post-processed images, rather than the jpeg preview you get on Breezebrowser, this can make a lot of difference. There is consequently a delay sometimes in building the previews but it doesn't seem particularly onerous & you don't have to wait for it to complete. I'm not sure what else Adobe do to the previews but they do look really good in LR for some reason.
The only option I really miss from my old way of doing things is a quick B&W view. In breezebrowser I can simply press ctrl+w and the image is displayed in black & white, pressing it again switches to colour. There doesn't seem to be an equivalent to this in Lightroom*.
So far it looks like a win for Lightroom.
*Oh hang on a sec - looks like pressing V does that...marvellous!
Tuesday, 25 August 2009
Lightroom and Iview Web Galleries
Regular readers will know that I use iview to generate my web galleries incorporating a Paypal shopping cart as I detailed here.
Phil Thomas contacted me to point out that although he had put the title of each picture into the metadata in Lightroom the titles were not appearing in the paypal shopping basket when he generated the galleries from iview.
It turns out that the field that Lightroom uses for "Document Title" in Photoshop maps to "Product" in iview... so the solution is fairly easy. If you look through the media.html file you will see the line:
repeated for each of the different items you are selling (item1Description will become item2Description on the next entry).
(iView:Headline) inserts the iview headline field into the code, so all we need to do is replace that with (iView:Product) and we are sorted. If you would rather use the filename simply replace (iview:headline) with (iview:filename) on each of these entries. Or you could even just put (iView:Headline) (iView:Product) (iView:filename) and get all three values in the text. If you want to use other fields take a look at the documentation here.
The alternative is to copy the product field to the headline field in iview, so here is a little iview script to automate that process for you.
Thanks for pointing this out Phil - saved me finding the problem myself.
Related Posts
Creating an ECommerce Site with iView and Paypal
Using The Controlled Vocabulary with iView Media Pro
Alternative template for iView Media Pro and the PayPal Shopping cart
Phil Thomas contacted me to point out that although he had put the title of each picture into the metadata in Lightroom the titles were not appearing in the paypal shopping basket when he generated the galleries from iview.
It turns out that the field that Lightroom uses for "Document Title" in Photoshop maps to "Product" in iview... so the solution is fairly easy. If you look through the media.html file you will see the line:
<input name="item_name" value="(iView:Headline) (iView:Item1Description)" type="hidden" >
repeated for each of the different items you are selling (item1Description will become item2Description on the next entry).
(iView:Headline) inserts the iview headline field into the code, so all we need to do is replace that with (iView:Product) and we are sorted. If you would rather use the filename simply replace (iview:headline) with (iview:filename) on each of these entries. Or you could even just put (iView:Headline) (iView:Product) (iView:filename) and get all three values in the text. If you want to use other fields take a look at the documentation here.
The alternative is to copy the product field to the headline field in iview, so here is a little iview script to automate that process for you.
Thanks for pointing this out Phil - saved me finding the problem myself.
Related Posts
Creating an ECommerce Site with iView and Paypal
Using The Controlled Vocabulary with iView Media Pro
Alternative template for iView Media Pro and the PayPal Shopping cart
Friday, 21 August 2009
Is Lightroom the Rightroom to be in?
For sometime now I have been advising people who asked me, to use Adobe Lightroom to manage their workflow. This is because Lightrom offers a structured environment for you to manage your photos in and there are plenty of examples workflows available for you to follow.
But the thing is, I don't use Lightroom myself...so why not ? Well I have a workflow that is very organised already and uses a whole wedge of different software and tools to get the results I want. So Lightroom's all-in-one model doesn't particularly hold a great set of advantages for me. I tried Lightroom 1 and wasn't hugely impressed as it seemed to lock you into its ow view of the world and so didn't fit too easily into my workflow.
I have been meaning to take a look at Lightroom 2 for a long time, but it has been difficult to find the time until now. I recently was hit by the swine flu virus and consequently spent a lot of time laying exhausted around the house. Having bored myself senseless with daytime TV, I decided that it might be worth taking a look at Lightroom.
I spent the small amount of time I had between sleeping and coughing, watching the Adobe video guides to Lightroom and I have to say that it does look rather good. It still feels a bit "claustrophobic" to me and i have a feeling I will soon be learning LUA (The scripting language of Lightroom) to get round what i see as the limitations. But it does seem to be worth a play with now.
I have ordered a couple of books so I'll be reading them over the next few weeks and working out the best way to integrate it into my workflow. I'll let you know what I discover.
But the thing is, I don't use Lightroom myself...so why not ? Well I have a workflow that is very organised already and uses a whole wedge of different software and tools to get the results I want. So Lightroom's all-in-one model doesn't particularly hold a great set of advantages for me. I tried Lightroom 1 and wasn't hugely impressed as it seemed to lock you into its ow view of the world and so didn't fit too easily into my workflow.
I have been meaning to take a look at Lightroom 2 for a long time, but it has been difficult to find the time until now. I recently was hit by the swine flu virus and consequently spent a lot of time laying exhausted around the house. Having bored myself senseless with daytime TV, I decided that it might be worth taking a look at Lightroom.
I spent the small amount of time I had between sleeping and coughing, watching the Adobe video guides to Lightroom and I have to say that it does look rather good. It still feels a bit "claustrophobic" to me and i have a feeling I will soon be learning LUA (The scripting language of Lightroom) to get round what i see as the limitations. But it does seem to be worth a play with now.
I have ordered a couple of books so I'll be reading them over the next few weeks and working out the best way to integrate it into my workflow. I'll let you know what I discover.
Friday, 25 July 2008
Adobe Rumours
Being the sort of chap who has his ear to the ground and his shoulder to the wheel, I am picking up a few rumours about Adobe:
Word on the street is that the full version of Lightroom 2 should be released next week. This should be a very exciting release, now that Adobe know how the system is actually used and that there is a huge market for it this should be a release well worth paying for. I might even move over to lightroom myself....if I can ever get a decent result out of ACR :)
I am also told that photoshop users should invest in a decent graphics card. Photoshop CS4 seems to be tuned for good cards and is blisteringly fast off a decent one.
Further rumours abound about other surprise announcements that the imaging giant has up its sleeve. It is certainly an interesting time for Adobe as they use their base in imagig and web tools to go head to head against Microsoft in the battle of AIR versus Silverlight.
Word on the street is that the full version of Lightroom 2 should be released next week. This should be a very exciting release, now that Adobe know how the system is actually used and that there is a huge market for it this should be a release well worth paying for. I might even move over to lightroom myself....if I can ever get a decent result out of ACR :)
I am also told that photoshop users should invest in a decent graphics card. Photoshop CS4 seems to be tuned for good cards and is blisteringly fast off a decent one.
Further rumours abound about other surprise announcements that the imaging giant has up its sleeve. It is certainly an interesting time for Adobe as they use their base in imagig and web tools to go head to head against Microsoft in the battle of AIR versus Silverlight.
Subscribe to:
Posts (Atom)