Showing posts with label Equipment. Show all posts

Friday, 11 November 2011

A hard case for the LEE Big Stopper

The LEE Big Stopper is fast becoming one of the most popular filters in photography today. The ability to setup the shot with other filters then slide in the 10 stopper at the last moment makes it much easier to use than the screw in filters.

In fact the only real problem I have found with the Big Stopper is the absence of a hard case for it. The soft pouch they come in is great for stopping it getting scratched but if you are as clumsy as me they offer little protection against snapping the thing. The filter is actually as brittle as cinder toffee, so if you are not careful your £100 filter will end up looking like mine:

Luckily when I explained my predicament to the good people at LEE helped me out with a replacement filter really quick.  Fantastic customer service from LEE, I'm never buying filters from anyone else.

So - how to keep my new filter from the same fate?  It was time to investigate a hard case option.   LEE don't make a hard case and a search on the web drew a blank too.  It was time to make my own.

If you are old enough you may remember that before downloads, music used to come on a physical disc called a CD. I happen to have a fair few of these archaic things laying around the house and they are almost exactly the right size to be a Big Stopper case.

Conversion from ancient recording technology to modern filter storage is simple:

  1. Take out that old Steps CD and chuck it in the bin
  2. Pull out the bit the CD was laying in throw it away.
  3. Tape the LEE exposure table to the inside of the case so you can find it easily
  4. Cut two pieces of lens cloth to fit the inside of the case and fix them using double sided tape.
  5. Cut a thin layer of packing foam the to fit the inside of the case.
  6. Cut a filter sized hole in the foam and fix it into the the case with double sided tape
  7. And your done.


Please let me know if you decide to make a similar case & if you find a better way of doing it.

Friday, 2 October 2009

Backing up to the Cloud - Got there in the End!

Hopefully long term readers remember my articles on backing up to the cloud:

Backup to the cloud - Part One
Backup to the cloud - Part Two
Backup to the Cloud - Final Thoughts

Well I am sure that none of you care but I just thought I would mention that my image archive backup is now complete and safe in the web:

Safe in the Web
(Click to View Large)

My Image archive was 300gb but I decided to got through it & cull a load of images I didn't want and would never use. I know some people keep everything but I really can't see the point in keeping out of focus shots, test shots, etc.

The cull got it down to 150mb and it has since grown back up to 285gb (sheesh those 5DmkII files are big). So it has take 163 days (I lost 10 due to being away) and has averaged 1.74GB a day. That means the system can cope with around 50GB a month of images, which is easily enough for my needs.

Think we can count that as a success and I can rest easy knowing my images are safe.

Thursday, 27 August 2009

7 Backup Strategies

Now I know I like to bang on about backups from time to time, but that's because backups are a computer users best friend.

I've just come across this article on the PC World site, which gives a great overview of the different options and technologies available to PC users at the moment. Its well worth a look and if you are thinking to yourself "I must do something about backing up", now is the time to do that something!

Monday, 20 July 2009

Loving a Lens

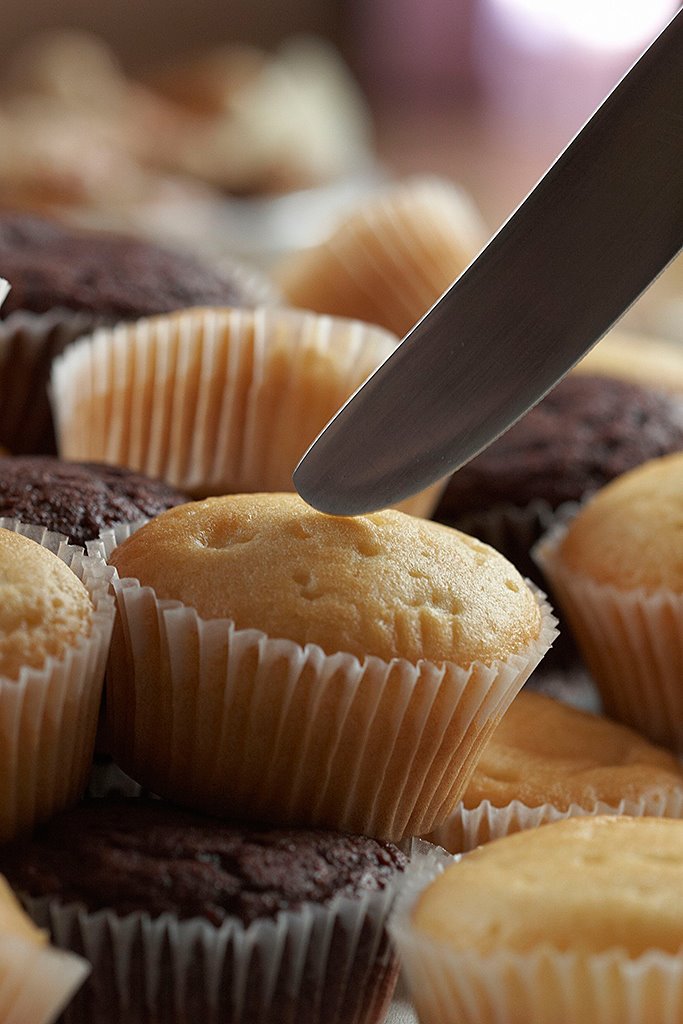
So, much against my better judgement I agreed to photographs a friends wedding, a few weeks back. It'll come as no surprise that I have been real busy processing the pictures, which is why this blog has been sadly neglected for far too long.

I decided that for most of the shoot I would use my 5DmkII with the 24-105 Lens, which is an ideal work horse for a wedding, especially with its high ISO performance. Though the downside of it is that processing hundreds of the huge files it produces, has moved a new laptop from the "desirable" list to the "downright essential" list! In addition to the 5D2 I decided that for the incidental shots I would take my 20D and the 100mm f/2.8 macro lens.


Cutting the Cake
(Click to view larger)

It has been seven months since I shot with the 20D and even longer since I used the 100mm macro on it. So it was a complete revelation - like falling in love all over again. For me there is something magical about that focal length, on the crop camera which really fits with the way I see the world. I make 100mm on the crop camera about equivalent to 160mm on the full-frame (I hope that's right) and that narrow view of the world seems ideal to me.

Being a prime it restricts you in a way that seems to force you to be more creative, there are only certain shots you can take, so you have to think a bit more about each shot.

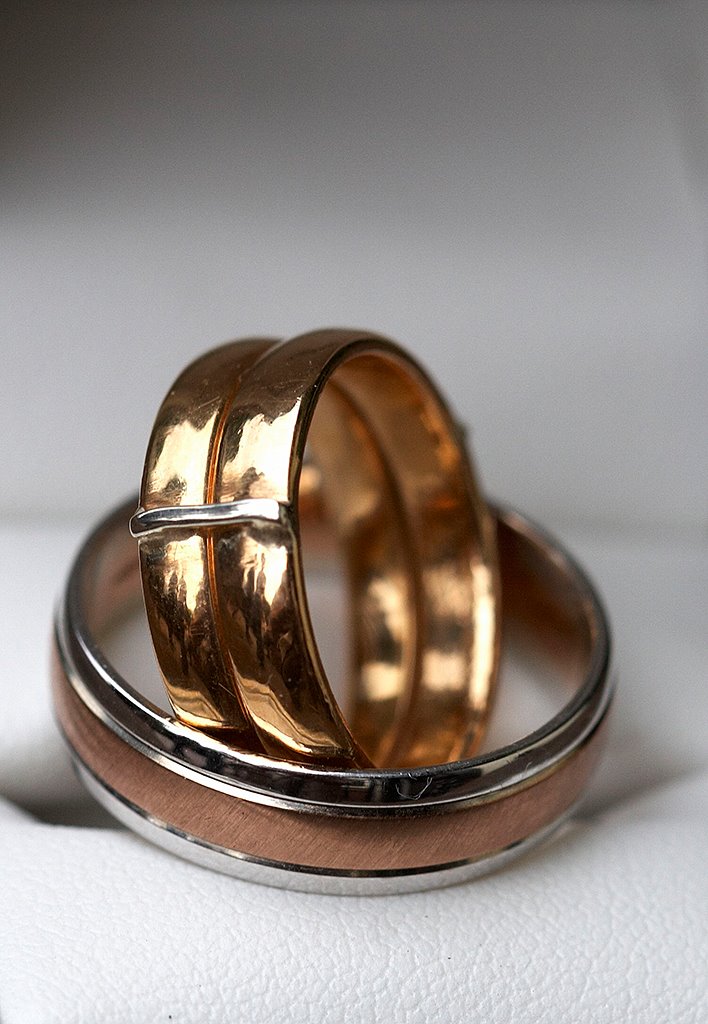
The Rings
(Click to view larger)

The strange thing is, I'm not too keen on the 100mm on the full frame 5D2. It suddenly seems too short and I really don't like to crop using a prime as it seems to defeat the point of using a prime.

Hmm - I wonder if I can get a 160mm canon fit prime somewhere.

Monday, 20 April 2009

Backing up to the Cloud - Part One

I might have mentioned it before but I make no apologies for mentioning it again, make sure you have your data backed up. There are loads of interesting and unusual ways that you can lose the information that you need and a good backup strategy is the only way to protect yourself.

Having taken the time to asses my existing backups and possible threats to my data I came to the conclusion that I had no real protection against a total loss event. What's a total loss event? Well in my case I can see some possible events that would fall into that category: flood, fire & theft. A house fire would melt all my hard drives, a flood wouldn't do them much good either and it is possible that some thieving toe rag could break into the house and clear out all originals and backups.

In the Clouds


So how can I protect my data from total loss? Well traditionally the answer is off-site backups. An off-site backup is where you copy your data to disk or tape and then move those devices far enough away from you to ensure they survive a disaster. This is common practice in the business world. Alternatively, we can take advantage of the internet and backup to The Cloud. Having considered a system of swapping portable hard drives in and out of the house, I thought it would be worth trying out the cloud first as its the modern way.

The first decision was to decide what I wanted this backup for. For me this would be a "last resort" backup as I have a layered strategy:
  • Currently active work on any PC is copied overnight to another PC using Allway Sync. This allows me to recover yesterdays work quite easily should I accidental delete or corrupt a particular file.
  • Once a month each machine is imaged to a USB drive, using Acronis True Image. This is to protect against HDD failure and to allow me to recover files that are not on the daily backups i.e. ones I deleted a few weeks ago and suddenly realise I need now.
  • Image archive. Once a month I move the previous months photos to my herd of buffalo.
  • Cloud backups would add the final layer that allows me to protect myself from total loss and to go back to much older files if I need to.
First I looked at each PC and decided what I really needed to store off-line:
  • Email is a major priority, all sorts of things can be kept in the various folders of an email system: logins to infrequently used systems, licence keys for downloaded software, travel bookings, reservations.
  • Documents created in Wod, Excel,etc
  • IView Media Pro catalogues, so I can find all my images.
  • My Image Archive
  • The latest release of Lemon
  • A copy of my website including the templates used to generate it.
Some things I decided not to back up:
  • Music: I don't think I need to keep a copy of my music as I have it all on CD & 2 hard disks. In event of a total loss I would just have to buy all those CDs again.
  • Bookmarks: For some people their web bookmarks are essential but I hardly use bookmarking so there is no need to worry about them.
  • Programs: As long as I have the licence keys I should be able to download the latest versions.

So now we have established the why and the what. In part two we will look at the how.

Wednesday, 14 January 2009

Well that works then!

I, like many photographers using Canon kit have been eagerly anticipating the replacement camera for the Canon 5D. The 5d had been around for a lot longer than most cameras for two main reasons: it was a good design and it had little competition. I wanted one but it hardly seemed worth buying one if Canon were going to bring out a replacement model as soon as I bought it. Finally Canon announced and released before Christmas the cunningly named Canon 5DmkII.

Dragging the Chains
(Click to view Large)

The main attractions of the new camera for me was 21 mega-pixies*, integrated cleaning system and most of all full-frame. Live view is an added bonus as it is something I really miss from my days of using a Fuji S602, I don't often shoot using the back as a viewfinder but it can be really handy when setting up a tripod in awkward positions. Apparently it also can shoot HD movies but I doubt I will be using that.

Frost on the Beach
(Click to view Large)

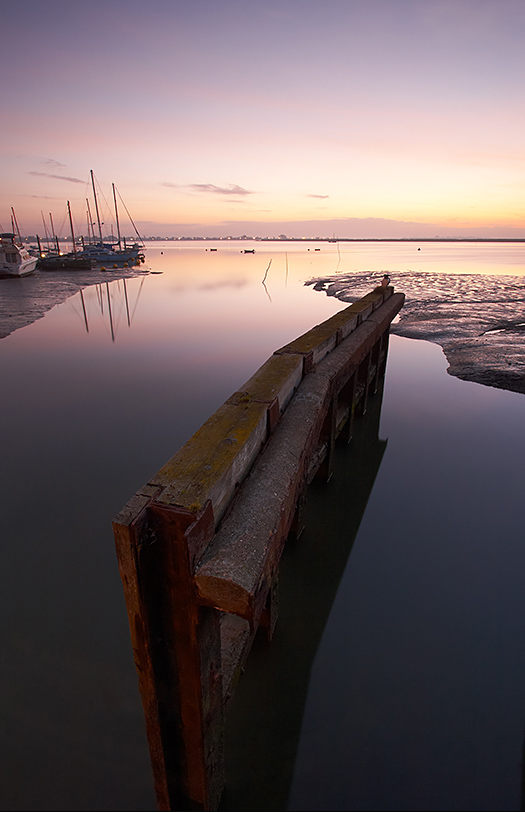
Well it arrived on Friday; I had a quick play after it arrived, then a few shots on a dull Saturday. Sunday morning I had agreed to meet up with with two fellow Essex photographers, Kevin Goodchild & Clive Burrow. Kevin had recommended Thorpe Bay in Southend, we got there well before the dawn and the light was fantastic.

Thorpe Bay lasso
(Click to view Large)

So what is the verdict on the 5D?
The big viewfinder is great, it is bright and clear, I actually feel like I can see what the picture will be. The 20D viewfinder seems a bit dark and vague in comparison!
The other unexpected feature I like is that when you press the focus selector button twice the back displays all the shooting info: mode, exposure, bracketing, wb, ISO. Even better you can change them there too. Hopefully that should save me mornings of shooting at ISO3200 with a florescent white balance.

The only downside so far is that I have had to change to 8bit tiffs as the file sizes for 16bit tiffs were so huge that Photoshop and Capture One ground my PC to a halt. Though with 8bits everything seems back to speed.

Light and Lock
(Click to view Large)


* Mega-pixies are the small creatures who live in the camera. When you open the shutter they quickly view the scene and make a sketch of it. Obviously the more pixies you have the less sketching each needs to do - giving them more time to make a better job of it.

Monday, 24 November 2008

More Christmas Gifts for photographers

Yet more things I want for Christmas you could buy your favourite photographer for Christmas.

Clothing


Craghoppers Kiwi Trousers
The trousers with a leg pocket big enough to take a full set of Lee filters.


Craghoppers Winter Lined Kiwi Trousers
I have raved about these before - great for cold winter mornings.

Printing


Ilford Galerie Gold Fibre Silk
I've been meaning to try this out for a while, reports are that it is excellent.


Falcon print positioner - Available from Silverprint
looks like it will save some time mounting prints


Courses
It's always a good idea to send your favourite photographer on a course with a master photographer. Companies I recommend are:
Northscape - Keith Henson
Visions of Britain - Jon Gibbs & Adam Burton
Landscape Photography Workshops - Kate Barclay and John Duckett

Friday, 21 November 2008

Christmas Gifts for Photographers

Here are a few ideas of what to get your photographer friends for Christmas. I offer this as a public service to all those looking to purchase a gift or stocking filler for the photographer in their life and definitely not a big hint to my wife as to what I would like for Christmas.

Books
A couple of good books have come my way this year that I can recommend to photographers of all abilities:

The Photographer's Eye: Composition and Design for Better Digital Photos
by Michael Freeman

This is a great book to help you really start thinking about composition.


The Moment It Clicks: Photography Secrets from One of the World's Top Shooters
by Joe McNally

Either enjoy the great pictures in this, learn how they were made or do both!

For beginners I will as per usual recommend Understanding exposure:


Books I haven't read but look like they might be of interest (if someone was to buy them for me) are:


Accessories

SanDisk CompactFlash 4GB Extreme III Memory

You can't have too many memory cards!


Op/tech Rainsleeve
I have been rained on a lot this year & some of these would have come in very handy!


Spudz Cleaning Cloth
Ideal for wiping sea spray off filters - though the camo print one does seem like a good idea ...drop that & you'll never find it again!

That should be enough to get you started, I'll be posting another blog on this subject as soon as I find some more goodies I fancy that make good presents for photographers.

Monday, 4 February 2008

Keep it Clean

Over at Lightingmods, Rui M Leal has produced a lovely detailed guide to how to clean your camera gear. It covers both lenses and sensors - good stuff & well worth reading.

All I need now is a guide to get sand out of tripod legs and how to clean your whole camera just after you have gone head first into some Thames mud and I'll be sorted!


Hadleigh Ray - Taken just before I launched myself & my camera into the mud
(Click to buy this image)

Friday, 25 January 2008

The power of the blog

It's quite a surprise to me the huge influence this little blog can have.

First I wax lyrically about how much I like my lensbaby and what happens? Mr Lensbaby himself, Sam Perdue, comments on my blog!

Then I create a check-list for photographers and what happens? Microsoft decide it's such a good idea they want to copy it.

But now, no sooner have I waxed lyrically about how wonderful craghopper furry trousers are but they need a leg pocket, when what happens? Through the door comes a parcel containing some of the very same trouser but now with the requested pocket!

Hmmm, I think I best only use these powers for good.

Thursday, 10 January 2008

Microsoft adapts Outlook for photographers

I don't know you come up with a simple idea like an equipment checklist for photographers and what happens your idea gets pinched by Microsoft. What don't tell me I wasn't the only person to have that idea, I knew I should have patented it!

Don't Forget your Keys
(Click to View Large)

Well anyway Microsoft have adapted Outlook for photographers:
"Microsoft has released a free Outlook plug-in to help photographers remember which equipment to bring to photo shoots they've scheduled with the calendar and contacts software."


Related Posts

Landscape Photography Pre-Fight CheckList
Bill Speaks Detailed Packing List

Wednesday, 9 January 2008

My (current) Favourite bit of Equipment

So here in the Northern Hemisphere it is winter. Though with climate change it can be a little confusing as some days can be very warm.... but stand by the coast before the dawn comes up and you know it's winter.

So my current favourite bit of equipment is not a camera or accessory but a pair of trousers! The Craghoppers kiwi fleece lined trousers are a god send this time of year.


Furry Trousers to keep you warm and snug

On a cold winters morning fleece is your friend and combined with a practical outer shell they are perfect for standing leaning on your tripod and wondering if the sun will ever come up.
The slightly baggy fit is ideal for those really cold mornings when you need thermals underneath. I love em, if only they had cargo pockets to put your filters in like the standard Kiwi trousers do, they would perfect.

Highly recommended to keep your uglies snugly.

Thursday, 8 November 2007

Check your Gear..even if you think you don't need to

Sunday morning I got up early (4:30am) and headed down to Heybridge Basin to see if I could get some dawn shots. Heybridge basin is where a canal (the Chelmer Navigation) meets the tidal estuary of the river Blackwater. A sea-lock connects the two, when there is a high tide.

The river itself is surrounded by high sea walls and for most of the time the tide is out. So it is not an easy location to shoot, but I had planned my shoot for a time when high tide coincided with dawn.

The night before was the Saturday nearest to Guy Fawkes Night, which means an awful lot of fireworks. I'm sure this is a lot of fun for a lot of people but for us it's a pretty retched time as you try to comfort two terrified dogs, who get really stressed out by the bangs and occasionally throw up with the stress...which is nice. In the middle of this mayhem I was trying to pack my gear for the following morning.

I packed carefully, following my checklist, but when it came to the point of checking if the batteries were fully charged I looked at the camera and it said 3/4 full plus I knew I had a spare battery in my kit so, with all the rest of the hassle that night, I didn't bother....big mistake!

Things started off well with me perching on the edge of the lock to get an image as the sun started to rise over Northey Island.

Heybridge Dawn
(Click to view large)

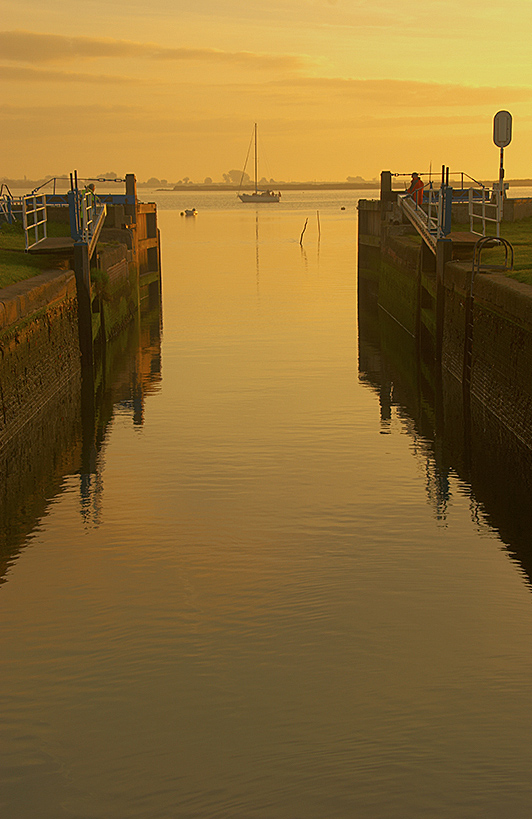
Then the most remarkable thing happened, as the tide started to rise the place burst into life, the lock keepers appeared & started to open the lock, boats started to move and even the pub opened..all at 7 o'clock in the morning!

Obviously high-tide is the only time that boats can get in and out of the basin and so people have to build their activities around it. Realising that it wouldn't be long before a boat made it's way towards the lock I positioned myself on top of the rear lock gates and waited till the boat came in to the exact position I needed it to make the composition I had set up complete.

Waiting to Lock
(click to view large)
If you look carefully you can see a lock keeper on either side of the image, helpfully balancing the composition


Now all I needed to do was wait for the boat to come in to the lock and I would get a nice series of pictures of the boat locking in fantastic light. At precisely the wrong moment my battery ran out. So I quickly opened my pack and got the spare out...which was flat too!

I had no choice but to pack up and walk away, muttering to myself about the one that got away. Lesson learned - always check your spare battery has charge. I hope you can learn from this and don't suffer a similar fate yourself.

Wednesday, 24 October 2007

Recommended Kit - The Gepe Card Safe

Occasionally you come across a bit of kit that is brilliantly simple yet works perfectly. The Grepe Card Safe is just such a thing.It is really nothing special, just a plastic box to put your memory cards in, but the manufacturers have actually thought about how people will use it.


If you use the "face up = empty, face down = full" method of organizing your cards then it's little windows that allow you to see the cards are rather useful; no need to open the case to see what it contains.

More importantly they are pretty shockproof, waterproof and they float. This came as an absolute relief to me when shooting at West Burton Waterfall, clambering about on the rocks I looked down in to the stream and saw my cardsafe slowly floating down the stream! Luckily I managed to grab it before it disappeared out of site, over the lower falls and out to sea. The cards inside were completely safe and dry..marvellous.

Highly recommended for the disaster-prone outdoor photographer.

Tuesday, 16 October 2007

Mounting and Finishing Photographs - Part 7 (Conclusion or Why Bother?)

So now you know what's involved in mount cutting, framing & generally presenting my prints for sale. If you are thinking of doing something similar, it is important to ask yourself if it is worth doing; You can buy ready cut mounts cheaply off the internet and there are plenty of picture framers out there needing the work.

The choices come down to the following:-

Get someone else to do it all
Outsourcing your framing/mounting to a trusted local supplier is a very attractive option. The advantages are you should always get a professional job, you don't have to invest in training and equipment upfront and of course you don't have to spend time framing when you could be out taking pictures.

The disadvantage is that the cost per picture will be more and the lead-times may become a problem if you have found yourself a good framer who is consiquently rather busy.

Do some of it yourself
It's possible to buy ready-cut mounts off the internet or from a framer and assemble the frames yourself. The advantages are that you save yourself the purchase of a mount cutter and holding stocks of mountboard.
This needs to be played against a lack of flexibility that may be required for more odd-shaped mounts. Again lead times may be unacceptable and you don't want your exhibition delayed by a post strike. You will still need to put the image together frame & wrap the image yourself so you are not saving a huge amount of work.

Bluebell Stripes ~ A panoramic shot which requires special mounting & framing
(Click to view large)

Do it yourself
The start-up costs and initial investment in time for the DIY approach can be onerous at first, but when you have got past these they offer a flexibility that is extremely useful. Streamlining the process, means that for me waiting for the print to come off the printer is the biggest time lag in my processes - framing and mounting have a relatively low amount of my time devoted to them.

In addition, mount cutting is a useful skill in it's own right and as you become involved in producing finished prints you gain an insight in to framing & presentation that is difficult to acquire otherwise.


That's All Folks.
I hope you have found these blogs on framing & presentation useful. If you have, or you would like to know more, please leave a comment. I love reading the feedback I get on this blog.


Other posts in this series (Mounting and Finishing Photographs)
Part 1 - Introduction
Part 2 - Preparation
Part 3 - Mount Cutting
Part 4 - Final Assembly
Part 5 - Framing
Part 6 - Equipment
Part 7 - Conclusion

Monday, 15 October 2007

Mounting and Finishing Photographs - Part 6 (Equipment)

Tools for the job: Mat cutter with extension arm, angled cutters for the window, straight cutters for mountboard and foamboard, pencil, duster (this gets used a lot), cutting mat to prevent damage to table when putting down tools , Framers tape in dispenser, ATG tape gun, good quality light source (anglepoise lamp) - all on a table big enough to take a sheet of mountboard.

I have had a few questions about the equipment and suppliers I use so here are a few details for you. If you need to know anything else..just ask.

For cutting mounts I use a mat master 860 - from FrameCo. The squaring arm (I added the extended one a while back) makes cutting backing boards and mats to size a doddle. Frameco give great customer service: my first cutter developed a fault (well out of warranty) , I phoned them up and they were happy to send me a replacement.

For sticking the mat to the backing board then its a very good idea to use an ATG Tape Gun, so much easier and quicker than using double sided tape.

For embossing the limited edition certificates, I use a stamp from oyez which is individual engraved with my company name & "Limited Edition". I was really impressed when this was delivered less than 24 hours after I ordered it.

I buy all my framing Supplies (mountboard, foamboard, blades, tapes, wire,etc) in bulk from Lion.


Other posts in this series (Mounting and Finishing Photographs)
Part 1 - Introduction
Part 2 - Preparation
Part 3 - Mount Cutting
Part 4 - Final Assembly
Part 5 - Framing
Part 6 - Equipment
Part 7 - Conclusion

Friday, 12 October 2007

Mounting and Finishing Photographs - Part 5 (Framing & Wrapping)

Framing
For exhibitions I buy my frames in bulk from lecira. I find that a wall of pictures that are all framed and mounted in a similar way, looks much more cohesive than lots of different mounts/frames and concentrates the eye on the images, not the presentation.

In addition I find a high percentage of images I sell at exhibition are framed, but sales are not evenly distributed, one image might sell lots of pictures, yet others won't sell at all. If I could work out which ones would sell at each exhibition I'd be a happy man! Being able to reuse the frames to meet orders is a godsend and saves keeping loads of extra frames in storage between exhibitions.


My Framed Pictures on Exhibition
(Click to wander round the virtual exhibition)

To frame a photo, the picture is dropped in to the frame and the back held in place with flexipoints. The frame is then turned over and checked for dust and hairs. Once I am finally satisfied that everything is clean then I add the hanging equipment (hooks & wire). I use flat D rings that slip on to the backingboard and Super Softstrand wire for hanging as it is very easy to work with and gentle on the fingers! The back of the frame is sealed up with framers tape to prevent dust getting in the frame. Finally the certificate of Authenticity is fixed to the back of the frame.

All frames are then finally checked and wrapped in bubble wrap to prevent damage during transport & storage.

Wrapping
Mounted pictures are wrapped with clear polythene wrap to protect them and this stuck together with 3M crystal tape and makes for a very attractive package. I intend in future to use clear plastic bags but am at the moment unable to find a supplier who will do them in the sizes I need.


Other posts in this series (Mounting and Finishing Photographs)
Part 1 - Introduction
Part 2 - Preparation
Part 3 - Mount Cutting
Part 4 - Final Assembly
Part 5 - Framing
Part 6 - Equipment
Part 7 - Conclusion

Thursday, 11 October 2007

Mounting and Finishing Photographs - Part 4 (Final Assembly)

Final Assembly
The final package is a sandwich of foamboard, photograph, and windowed mountboard. To produce this first the photograph is hinged off the backing board with two small pieces of tape.

Print hinged of the backing board

Then the mount is sandwiched to the foam board using ATG (Adhesive Transfer Gun) tape (ATG is basically double sided sticky tape dispensed from a gun). The hinging allows for expansion and contraction of the paper due to atmospheric conditions. The ATG tape holds the whole thing together into a solid package.

The completed sandwich

Each print is signed & numbered and the details entered into my Limited Edition management system: Lemon
A Signed Print!

I use lemon to generate a certificate of ownership which is embossed by a limited edition seal, signed and then taped to back of the picture

Certificate of Authenticity


Other posts in this series (Mounting and Finishing Photographs)
Part 1 - Introduction
Part 2 - Preparation
Part 3 - Mount Cutting
Part 4 - Final Assembly
Part 5 - Framing
Part 6 - Equipment
Part 7 - Conclusion

Wednesday, 10 October 2007

Mounting and Finishing Photographs - Part 3 (Mount Cutting)

Mount cutting

First I need to calculate the size of the window I will cut in the mat, a useful aid for this is Mat Works! - which is a great little free program for sizing mounts. In fact it's so good I even paid for it!


MatMaster System 860B - my weapon of choice

As I have all my boards cut to size, cutting the mount it is simply a matter of cutting the window for each image in the board, and I frequently break this process down into marking out & cutting - so that I mark up a batch of boards then cut them all which saves changing from pencil to cutter each time. Breaking the processes out into steps and performing each step on an entire batch is quicker and more accurate than cutting the mat to size, then cutting the window for each one individually and having to resetting the mount cutter and tools each time.

Learning to cut mounts

I taught myself to use a mount cutter following the manual. I went through a lot of mount board at first, though its one of those things that once you've got the hang of you can't see how you ever managed to have difficulty with it in the first place.

For cutting a single mount it is just a page of instructions and not too difficult. Though I would think a course would get you up to speed a lot quicker and would take you through the whole process of matting a print. I learnt a lot of things the hard way..making sure everything is exactly aligned, keeping your work area scrupulously clean, etc,etc,

How to cut a mat (pdf)
How to cut a mat (video)


Mount cutting tips
  • Always make sure your work area and hands are completely clean, any dust will transfer onto the boards and leave mucky fingerprints.
  • It's always a good idea to mark out your window in pencil first, then offer it up to your image to make sure you have the right sizes..measure twice, cut once.
  • Only work on the back of the mountboard.
  • When using non-textured white faced board it is easy to accidentally mark up the front face, then cut the mitre, by mistake. Either make sure the bar-code is visible on the side you are marking or lightly scribble on the back with pencil to stop this happening.


Other posts in this series (Mounting and Finishing Photographs)
Part 1 - Introduction
Part 2 - Preparation
Part 3 - Mount Cutting
Part 4 - Final Assembly
Part 5 - Framing
Part 6 - Equipment
Part 7 - Conclusion

Tuesday, 9 October 2007

Mounting and Finishing Photographs - Part 2 (Prepration)

The advantages of always working to a standard size is that it speeds up my processes immensely.

When I get a box of foam board & a pack of mountboard delivered, the first thing I do is spend a short while cutting them all down to my standard size, then pop them back into the box for storage. I have my mount cutter pre-marked with the standard sizes I use, this speeds things up and I even have two cutting blades (one for foamboard & one for mountboard) so I don't have to reset the blades.

A few seconds saved looking for the exact position.

On the foamboard (which is used to provide the backing to the picture) I use the mountcutter and a pencil to draw a line at 2.5 inches in from the bottom and one 2.5 inches from the side. If you place a sheet of Super A3 against these lines it is completely centred..magic!

Its a good idea to prepare a clear clean work space in which to work as mountboard can take up a lot of space. A large table makes an ideal work surface but in addition I also need room to store prints that are drying, mounts that are in progress and a storage space for tools. Even if I only used the area the day before, I always take the time to dust all the work surfaces as working with white board means dust can mark the face of the boards all too easily.

A habit I adopt is to regularly change the blades on the cutter, as soon as they become slow or "snaggy" I replace them. Blades are a lot cheaper than mountboard.


Other posts in this series (Mounting and Finishing Photographs)
Part 1 - Introduction
Part 2 - Preparation
Part 3 - Mount Cutting
Part 4 - Final Assembly
Part 5 - Framing
Part 6 - Equipment
Part 7 - Conclusion