Sometimes I can be really dim. I have been using Lightroom for ages now and it has only just dawned on me what I should be doing.
Usually when I look through my Lightroom catalogue it is with some sort of purpose in mind. I might be selecting pictures to go into a competition or to send to a magazine, or maybe even just those I think might be "worth a print". The trouble is, I will often select the pictures, process them and forget all about them. So if in a months time I want to get hold of all the images I sent to a particular magazine, I would have to hope that I could find it in my emails, or the directory I exported the files to - or more usually just desperately try to remember them.
My "purpose" for selecting a group of images is useful information and its pretty obvious I may need that information in the future. Basically, I have been throwing away information....that makes me a very bad Lightroom user. The whole point of having a computer is for it to store information for me.
So, now I have decided to make it a rule to always create a collection to store the images I am selecting. The collection should describe my purpose in selecting the images. If I start getting swamped in collections, I can group them into collection groups like "competitions" and "magazine submissions".
Hopefully this level of organisation will save a lot of desperate searching and head scratching in futre.
Here's hoping!

Thursday, 17 March 2011

Saturday, 12 March 2011
The power of a picture
It's a funny thing, as a photographer who looks at and analysis pictures every day, it is so easy to forget what power a photograph can actually hold. We spend ages working on composition, exposure, processing, etc and it is so easy to get absorbed by the process and forget what a photo can actually mean to people.
A reality check came for me this week. Unfortunately a good friend of my wife died last week, taken well before her time by cancer. Her family got in touch with me to see if I could help as they had no recent photos of her. A quick look through my archive and I managed to pull up 20 or so shots of her from the shoot I did at a wedding. Upon looking through them, this seemed the best shot I could find:


I printed it using the qimage rip to force my now tired and exhausted megapixies, back up to a 10x8 print. Framed and mounted it looked OK.
I popped the picture round to the family and was absolutely blown away with how grateful they were to see a nice picture of their mum/wife/daughter., To me it had become an exercise in masking, reducing pixelation getting a good print and doing the best job I could. Suddenly I realised that all the technical stuff wasn't worth a hill of beans compared to the memories and love it evoked for them.
Do yourself a favour - make sure you have plenty of pictures of the people you love.
A reality check came for me this week. Unfortunately a good friend of my wife died last week, taken well before her time by cancer. Her family got in touch with me to see if I could help as they had no recent photos of her. A quick look through my archive and I managed to pull up 20 or so shots of her from the shoot I did at a wedding. Upon looking through them, this seemed the best shot I could find:
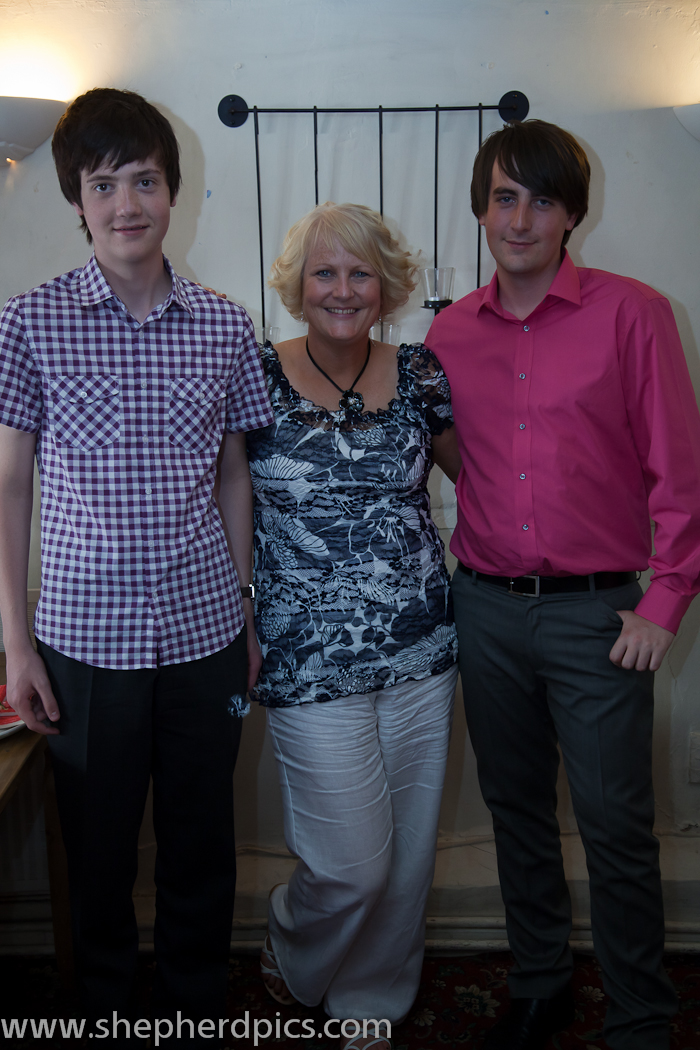
Before - A proud mum with her two boys.
Its a nice enough shot, but the family were looking for a simple head and shoulders shot. It was time to fire up Photoshop. Not for the first time, I was really grateful for the 21 megapixies who live inside the 5DmkII. All that resolution allowed me to crop much more than I would have ever dared before. Then it was some cloning, painting in a new background and added a vignette. The final result was this:

After - gone but not forgotten
I printed it using the qimage rip to force my now tired and exhausted megapixies, back up to a 10x8 print. Framed and mounted it looked OK.
I popped the picture round to the family and was absolutely blown away with how grateful they were to see a nice picture of their mum/wife/daughter., To me it had become an exercise in masking, reducing pixelation getting a good print and doing the best job I could. Suddenly I realised that all the technical stuff wasn't worth a hill of beans compared to the memories and love it evoked for them.
Do yourself a favour - make sure you have plenty of pictures of the people you love.
Tuesday, 1 March 2011
Paul Stefan is photographer of the month for March
Paul Stefan was awarded practical photography's photographer of the year in 2006. When you look round the images on his website, this comes as no surprise at all.


by Paul Stefan
Previous Photographers of the Month
Friday, 11 February 2011
The Eyes have it
Just been viewing Thomas Shahans macro photographs of insect eyes. Never have bugs looked so good.

Male Striped Horse Fly - Tabanus lineola
Thomas Shahans
Thursday, 10 February 2011
Chris's crash course in Exposure
I wrote these notes for a friend some years back, whilst tidying up a few things I found it again and thought it might be best as a blog entry. So forgive me if this all seems familiar.
So 500 means 1/500th of a second and 2" means 2 seconds.
So f2.8 will be a big hole or "wide open" and f/22 is a tiny little hole. Aperture controls depth of field - f2.8 is not much, f/22 is loads.
When you view through a lens normally you are seeing it wide open. The depth of field preview button allows you to see what it looks like at your chose aperture.
So if you have an 18-55mm lens at the wide end (18mm) you can handhold as slow as 1/20th of a second, but at the long end (55mm) you should chose 1/55 of a second or slower. Image stabilisation allows you to go 1 or 2 stops slower.
With good technique you should be able to shoot at slower speeds than the rule, but how much slower is something to experiment with and learn for yourself.
Understanding Exposure - highly recommended as further reading.
Shutter speed
Shutter speeds are shown as fractions. Until the go over a second, then they are shown with " after them.So 500 means 1/500th of a second and 2" means 2 seconds.
Aperture
Aperture is the size of hole you are shooting through, it is recorded as a fraction.So f2.8 will be a big hole or "wide open" and f/22 is a tiny little hole. Aperture controls depth of field - f2.8 is not much, f/22 is loads.
When you view through a lens normally you are seeing it wide open. The depth of field preview button allows you to see what it looks like at your chose aperture.
Depth of Field (DOF)
Depth of Field is the amount of the picture that is in focus (which is affected by aperture as previously mentioned). Also the longer the lens the less dof you have available, but don't worry about it to much its easier to see than explain. |
A Shallow depth of field means the poppy is in focus
but the rest of the field is blurred.
|
When to use a tripod?
The rule of thumb for hand-holding shots is that the shutter speed should be no slower than 1 over the focal length.So if you have an 18-55mm lens at the wide end (18mm) you can handhold as slow as 1/20th of a second, but at the long end (55mm) you should chose 1/55 of a second or slower. Image stabilisation allows you to go 1 or 2 stops slower.
With good technique you should be able to shoot at slower speeds than the rule, but how much slower is something to experiment with and learn for yourself.
What’s a stop?
If you put the camera in AV mode you will see that you can change the aperture in stages E.G. f/11 to f/16 to f/22 each of these stages is known as a “stop” the same applies to shutter speed. As shutter speed and aperture are intimately related changing one will change the other.So what's that mean in practice?
- A. If you want to take a landscape shot and you want to get everything in focus then you need an aperture of f/8,f/11 or above. So you set the camera to Av (aperture priority) and set it to f/11. Take a look at the shutter speed. Can you handhold it or do you need a tripod? If you want a longer exposure (for blurry water type effects) then set a smaller aperture (higher number).
- B. If you are shooting a single figure in poor light and you would like a blurry background then pick a low f number (f/4 or similar) then check your shutter speed to see if you can hand hold it.
- C. If you are using a tripod there is less to worry about, so you just adjust the aperture for the dof you want, or adjust the shutter speed for any blurring you want.
Understanding Exposure - highly recommended as further reading.
What about ISO?
ISO also moves in stops, so 100-200 is one stop 200-400 another. Increasing the ISO will reduce the shutter speed. You don’t get something for nothing though; increasing the ISO adds digital noise to the image (100 is virtually noiseless whereas 1600 has loads of noise). Though many modern cameras are virtually noiseless up to 400 ISO.Why would I change the ISO?
So you are hand holding, you have the lens wide open but the shutter speed is still showing as 1/25th, which is way too slow for your lens. If you increase the ISO from 100 to 400 you get 2 stops back which changes the shutter speed from 1/25th to 1/100th and now you can hand hold again….that’s magic!Further reading
A Beginner's Guide to Aperture and Depth of FieldTuesday, 1 February 2011
Adrian Oakes is photographer of the month for February
I have recently been enjoying some lovely images of the snow on Adrian Oakes website, there are some stunning images on there so why not take a look yourself and see what I'm on about.

Alone in the Snow
by Adrian Oakes
Previous Photographers of the Month
Wednesday, 26 January 2011
How to add a Google map to your photography site
I recently (well not that recently, but I'm just catching up with a lot of things), received an email asking how I had got Google Maps on my websites. The maps I am talking about are like this one on Images Of Essex and this at Images of Suffolk.
Fortunately both websites are Foliopic sites. Foliopic have a great system where you can keyword your images and search for the image, the URL for this search can then be used as a gallery.
For example keywording all our images and issuing a search for Orford gives this search: http://www.imagesofsuffolk.com/search/gallery/orford which can be used as an Orford gallery.
Other hosting sites may have a similar system, or you will just have to create galleries for each area
To add galleries, pick a point on the map then give it a name so you can change it later if you need to.
In the code box paste in something like:
and change
http://www.imagesofsuffolk.com/search/gallery/orford
to the url for your gallery and Orford to the name of the gallery
Repeat the above process for each gallery then save the map.
In Mapmaker click the Get Javascript button then paste your Google Api key in here
Now you can copy all the javascript ready to paste it onto your site.
Create a new page and click on the source button so you can see the HTML that makes up the page.
Delete all the HTML that is there currently and paste in the HTML from mapmaker.
Remove this block from the top:
And this from the bottom
Step 1 - Create the Galleries
The first thing you need to do is to actually create the galleries you will be linking your map to.Fortunately both websites are Foliopic sites. Foliopic have a great system where you can keyword your images and search for the image, the URL for this search can then be used as a gallery.
For example keywording all our images and issuing a search for Orford gives this search: http://www.imagesofsuffolk.com/search/gallery/orford which can be used as an Orford gallery.
Other hosting sites may have a similar system, or you will just have to create galleries for each area
Step 2 - Create The Map
I used http://mapmaker.donkeymagic.co.uk/ to automatically generate the API code for me. It is worth registering with the site as this allows you to save maps and you will be coming back to this time & time again as you add new points to the map.To add galleries, pick a point on the map then give it a name so you can change it later if you need to.
In the code box paste in something like:
<b><a href="http://www.imagesofsuffolk.com/search/gallery/orford"><b>Orford </b>Gallery</a></b>
and change
http://www.imagesofsuffolk.com/search/gallery/orford
to the url for your gallery and Orford to the name of the gallery
Repeat the above process for each gallery then save the map.
Step 3 Get your own api key:
To use Google maps you need to have your own API key. This is simple enough, go to http://www.google.com/apis/maps/signup.html to sign up and then copy the key.In Mapmaker click the Get Javascript button then paste your Google Api key in here
<!-- //Change the following line to use your own key available from http://www.google.com/apis/maps/signup.html -->


<script src="http://maps.google.com/maps?file=api&v=2&key=ABQIAAAARKYMX3qABRwgBGTOLfvdgBT2yXp_ZAY8_ufC3CFXhHIE1NvwkxTmhS_LQj6knfNR9GOtLZ_JFxncNQ" type="text/javascript"></script>
Now you can copy all the javascript ready to paste it onto your site.
Step 4 Create a new page
These instructions are specific to FoliopicCreate a new page and click on the source button so you can see the HTML that makes up the page.
Delete all the HTML that is there currently and paste in the HTML from mapmaker.
Remove this block from the top:
<div style="background-color: #fff2cc;">
&title>Simple Google map</title>
And this from the bottom
<style type="text/css">
div#popup {
background:#EFEFEF;
border:1px solid #999999;
margin:0px;
padding:7px;
width:270px;
}
</style>
</head>
<body>
<div id="map" style="width:600px;height:450px"></div>
</body>
</html>
Step 5 - Styling your map:
Add the following to your css file.
/************** MAP *******************/
#popup {
background:#EFEFEF;
border:1px solid #999999;
margin:0px;
padding:7px;
width:270px;
}
#popup a
{
color:black;
}
#popup a:hover
{
color:black;
}
Subscribe to:
Posts (Atom)